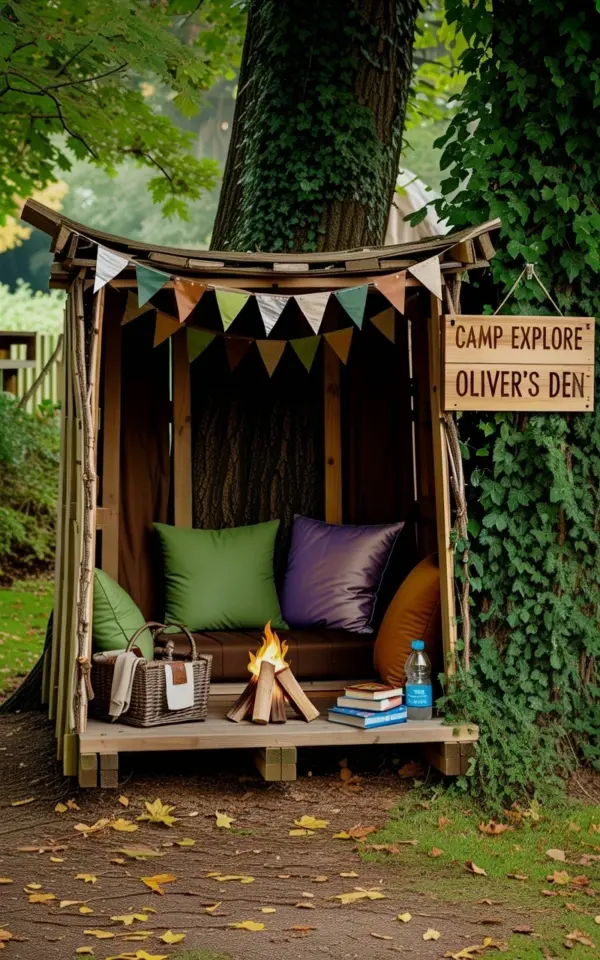
You’re staring at that sturdy oak in your backyard, the one with the low branch that begs for a platform. A treehouse reading nook is totally doable, but it can turn into a nightmare of crooked boards and wasted money if you rush it. I built one last summer, and honestly, I made every mistake on this list so you don’t have to lose sleep over the same ones.
I learned the hard way that the difference between a charming hideaway and a wobbly death trap comes down to a few specific choices. Let’s walk through the common screw-ups, because nobody wants to rebuild their A-frame design three times. Here’s the thing, the details matter more than you think, and a few of them are weirdly specific.
Mistake #1: Ignoring the Tree’s Health Before You Nail Anything
Look, a treehouse is only as good as the tree it’s attached to. You can’t just pick any old trunk with a nice lean and start hammering. I nearly bolted mine to a maple that had a nasty hollow section hidden behind a thick vine. Good thing I checked first, or the whole thing would’ve come down during a spring storm.
Before you buy a single fastener, inspect the bark for cracks, peeling, or signs of fungus. Check the root area for mushrooms or soft soil. And pay attention to the canopy, if large branches look dead or sparse, that tree is telling you something. Honestly, an arborist consultation costs less than a replacement platform and a hospital deductible. One visit saved me from building on a time bomb.
Mistake #2: Skipping a Solid, Level Base Platform
Here’s a mistake that feels obvious, but you’d be surprised. Everyone wants to save time and just bolt a few planks to the trunk. But a reading nook needs a flat, stable surface. The photo you’re picturing, the one with the cozy cushions and the fake campfire, that starts with a perfectly level platform. Without it, your books slide off and your spine curses you.
Use a long level and shim the support beams until everything is dead flat. If the tree trunk curves, cut the beams to fit around it, don’t force them. And for the love of all things sturdy, use lag bolts and heavy-duty brackets, not deck screws. I speak from a bruised tailbone when I say that waiting an extra hour for proper leveling is worth it.
Mistake #3: Choosing the Wrong Wood for the Frame and Deck
You’ll see pressure-treated lumber and think it’s perfect, and for the structural frame, fine. But for the platform where you sit with bare feet? No. That stuff gets hot, splinters like crazy, and the chemicals aren’t something you want your kids napping on for an entire summer. Use untreated cedar or redwood for the surface planks. They weather to that warm gray you see in the photo, the one with the weathered wooden planks that look rustic but still solid.
I made the mistake of using regular pine for my deck, and within nine months it had warped and twisted like a pretzel. Cedar is more expensive, but it resists rot and insects naturally. Also, that’s what gives the hideaway that classic, slightly silver aged look. Trust me, your cushions deserve better than rough, chemically treated grain.
Mistake #4: Forgetting Drainage and Airflow Around the Structure
This one sneaks up on you. You build a beautiful nook, hang your triangle bunting, and arrange the green and purple cushions just right. Then the next rainstorm arrives, and water pools under the platform. A week later, the wood smells like a swamp and the cushions are moldy. Not cute.
Leave a small gap between the deck planks for water to drain through. Don’t seal every crack like you’re building a boat. Also, keep the structure at least a few inches off the main trunk on the attachment side so air can circulate. That’s what prevents the rot that undoes everything. And speaking of the campfire decoration, keep it away from any fabric, even if the flames are fake. That synthetic grass and batting gets damp and gross fast.
Mistake #5: Making the Interior Cramped and Awkward to Use
I get it, you want to hug the tree trunk and feel like a forest creature. But you also need room to stretch your legs and turn a page. The mistake is building the nook too shallow or too narrow to actually sit comfortably. The A-frame design in the reference photo is great because it angles the roof up and gives headroom, but the floor footprint still needs to be at least four feet deep.
Measure your biggest cushion before you build, not after. I planned mine around a cheap floor pillow, then realized my actual reading chair was twice as wide. Don’t be like me. Put the bookshelf and the woven basket, yes the one with camping accessories, in a spot that doesn’t block the entrance. You want a graceful lounge, not a game of Tetris every time you grab a bottle of water.
Mistake #6: Skipping the Decorative Layers That Actually Make It Cozy
A bare wooden box is just a box. People think the reading nook vibe comes from the structure, but it really comes from the styling. The colorful triangle bunting strung across the top instantly softens the whole space. String it with a slight droop, not tight like a clothesline. Also, mix cushion textures and colors, don’t go monochrome. In the photo, the green, purple, and brown cushions create warmth that plain lumber can’t.
Here’s a list of the small details that turn a wooden platform into a retreat:
– A battery-powered string of warm fairy lights or a lantern, not just overhead light
– A low wooden tray or crate for holding a mug and a snack
– That artificial campfire decoration in the corner, it gives a glow without any smoke
– At least two books, but arrange them casually, not in a perfect stack with a sad succulent
– A small indoor/outdoor rug, if it fits, to anchor the seating area
People underestimate how much the bunting and pillows affect the vibe. But they’re the whole game. Also, consider adding a shallow shelf on the interior wall for a water bottle and a pair of reading glasses. You’ll thank me when you’re not groping under your thigh for them.
Mistake #7: Overestimating Your Skills and Underestimating the Hours
Alright, real talk. This project looks like a fun weekend, and it is, if you have a friend who builds decks for a living. Most of us don’t. The biggest mistake is thinking you’ll finish in two days. My treehouse reading nook took five weekends, including the one where I just sat in it and stared at the screws I hadn’t installed yet.
Be honest with yourself about your tools and experience. If you don’t own a circular saw and a drill with a level attachment, factor those into the cost. And don’t be ashamed to build a simpler design, like a corner platform instead of a full A-frame. The A-frame or a gable roof looks amazing, but it adds complexity with rafter angles. Start with a flat roof and a wrap-around rail if this is your first build.
I also recommend having a second person for the lifting part, because trying to balance an eight-foot beam while holding a drill between your knees is how you get a dent in your shin and a hole in your ego. Ask a neighbor. Bribe them with pizza. It’s worth it.
Speaking of things I didn’t plan, my cat discovered the nook before I finished and decided it was her personal throne. Now every cushion has a permanent indent. Which is fine, honestly, it adds character.
The Takeaway: Build It Right, Build It Once
Nobody regrets having a cozy backyard hideaway, but people definitely regret building it the lazy way. Check the tree, level the base, choose cedar, leave gaps for rain, give yourself room to stretch, style it like a den, and plan for twice the time you expect. Do those six things, and your treehouse reading nook will be the spot where every afternoon disappears.
When you’re finally sitting on those mismatched cushions, watching the bunting wave in the breeze and the fake campfire glow at your feet, you’ll forget all the swearing and the splinters. Now go measure that branch, buy the good wood, and send me a photo when it’s done. I’ll be here, mildly jealous and sipping coffee from my own tiny tower.
Leave a Comment