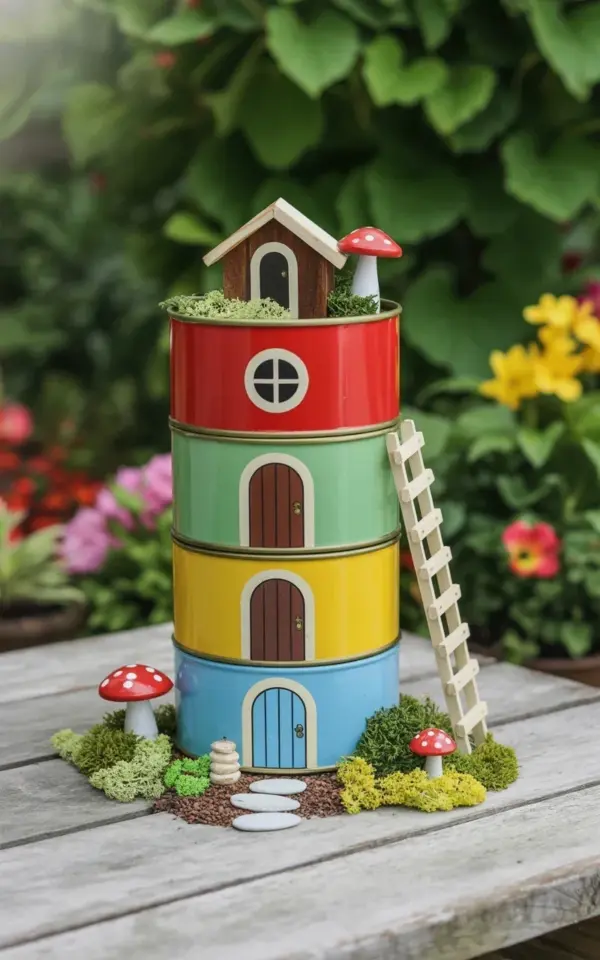
I turned ordinary tin cans into a whimsical tincanfairyhouse, and honestly the before and after still makes me grin. You know those stacks of recycling that sit by the back door for weeks? Yeah, that was the before. The after is this four-level candy colored tower with a wooden ladder, tiny toadstools, and moss that looks like it sprouted from a storybook. It started as a lazy Sunday idea and ended up as the most commented thing in my garden. Not gonna lie, I surprised myself.
Why I painted tin cans for a fairy garden instead of buying something
Here’s the thing: most fairy garden decor at the store costs a small fortune and feels mass produced. I wanted something that looked like a real little house, not a plastic castle from a discount aisle. So I grabbed five empty cans from the recycling bin. Soup cans, tomato paste cans, one tall olive can. Washed them, peeled off the labels, and realized I had zero plan. But that’s fine. Sometimes the best projects happen when you just start slapping on paint.
A quick tip: use a can opener that leaves a smooth rim, not a jagged mess. I learned that the hard way. My first can sliced my thumb. So yeah, watch your fingers. Also, rinse them well or you will smell tomato sauce every time the sun hits your fairy house. Gross.
This whole thing is the definition of repurposedgardening done on a shoestring. No trip to the craft store. Just trash and a little vision.
Choosing the color scheme for my miniature garden house
I wanted colors that pop but don’t fight each other. Red on the top can, then mint green, then yellow, then light blue at the bottom. That order felt right. Red draws the eye up. Mint and yellow are playful. Blue anchors it like a little sky base. I used craft acrylics, the cheap bottles from the dollar store. Two coats on each can, letting them dry between coats while I watched an episode of something dumb on TV.
One weird detail: the mint green looked almost gray under my kitchen light. I almost repainted it. But outside in natural light it turned perfect. So don’t panic if your paint looks off indoors. Trust the sun. And if you’re doing a colorfuloutdoordecor project, test your colors in the actual spot you’ll put it. That’s a lesson I only learned after painting a whole birdhouse purple once. Never again.
The photo shows the exact cans I used. Red circular window on top. Brown arched door in the middle can. Blue arched door at the bottom. Those doors? Hand cut from craft foam and glued on. Cheap and easy.
Stacking and securing the tin can levels DIY style
Ok so stacking cans sounds easy. Just pile them up, right? Wrong. They wobble. They slide. A breeze will knock your tower over before you can say “oops”. I tried hot glue first. Nope. The weight of the top cans pops the glue off. What worked was a strong adhesive like E6000, plus a thin layer of sand inside each can for weight stability. I poured a little play sand into the bottom can, then glued the next can on top. Let it cure for 24 hours. Solid as a rock now.
For the diyminiaturegarden folks: you can also use a wooden dowel running through all the cans like a spine. I didn’t do that because I wanted the house to sit directly on the moss base, but I’ve seen others do it and it works great. I just went with glue and sand. Lazy but effective.
The ladder is a twig ladder I lashed together with jute twine. It leans against the side. It’s not perfect but that’s the charm. A fairy house shouldn’t look like a Home Depot shed.
Adding doors, ladders, and tiny fairy garden decor
The tiny details make this thing sing. I cut doors from brown and blue craft foam, drew on little hinges with a black marker. The red window on the top can is just a circle with a cross inside, painted on. Toadstools? Made from polymer clay, painted white with red dots. I baked them in my toaster oven and glued them onto the moss. White stepping stones are flat pebbles I stole from a neighbor’s driveway (shh, they had too many).
Here’s a list of what I used for the fairy garden decor on this house:
- Five tin cans in graduated sizes (rinsed, labels off, sanded rims smooth)
- Acrylic craft paint in red, mint, yellow, light blue
- Craft foam sheets for doors
- Small twigs and jute twine for the ladder
- Polymer clay for toadstools
- Artificial moss from the floral section (the real stuff dried out and blew away, lesson learned)
- White pebbles for the path
- E6000 glue and play sand for weight
The whole project took a weekend. Half of that time was waiting for glue to dry. That’s my mild complaint: glue always takes longer than the package says. But whatever, it gave me an excuse to sit in the garden and drink iced tea while pretending to be productive.
The before and after of this tin can fairy house transformation
Before: a stack of dented cans sitting next to the cardboard recycling. After: a mini home with red, mint, yellow, and blue levels that catches the afternoon light like a stained glass window in miniature. The moss covers the base where the bottom can meets the ground, hiding the glue joints. The toadstools look like they grew overnight. The ladder looks like a fairy carpenter left it leaning after a lunch break.
My neighbor walked by and asked if I bought it online. I said “nope, those were my baked bean cans”. She didn’t believe me until I tipped it over to show the glued bottom. Honestly, that moment made my whole month. This is the kind of fairygardendecor that feels personal, not something you order off a website and unbox. Every scratch and paint drip tells a story.
And you know what else? It survived a thunderstorm. The sand weight kept it upright, the paint didn’t run, the glue held. So it’s not just cute, it’s functional. I call that a win.
Where to put your tin can fairy house for the best effect
I placed mine in a shady corner under a big fern. The moss thrives there, and the colors pop against the green. But you could put it on a sunny patio shelf or tucked into a flower bed. One thing: don’t put it directly on wet soil. The bottom can will rust. Set it on a flat stone or a ceramic saucer first. I used an old terra cotta drip tray painted to match. Cheap fix.
If you want to go full fairy village, make a few smaller cans as side houses or mushroom clusters. I’m planning a second one in purple and orange. Maybe with a little tin can windmill. Who knows. The point is, once you start making repurposedgardening projects like this, you can’t stop. It’s addictive. And way cheaper than therapy.
I’ve seen people add solar fairy lights inside the top can. I tried it but the light was too bright, ruined the magical vibe. So I put a flickering tealight candle on the moss next to it instead. Perfect. Just be careful with fire obviously. Don’t be that person.
So that’s the story. Recycled cans, some paint, a few glue mishaps, and suddenly you have a little world. It’s not perfect, it’s not museum quality, but it’s mine. And the kids in the neighborhood love it. One little girl leaves acorns on the doorstep like offerings. I swear fairies might actually move in someday.
If you have a stack of cans and a free afternoon, just try it. You don’t need fancy supplies. Start with one can, paint it, add a door, see what happens. I promise the before and after will surprise you. And if you make one, tag me. I want to see your colorful little houses. Save this idea for your next craft day and go make something weird and wonderful.
#tincanfairyhouse #diyminiaturegarden #fairygardendecor #repurposedgardening #colorfuloutdoordecor
Leave a Comment