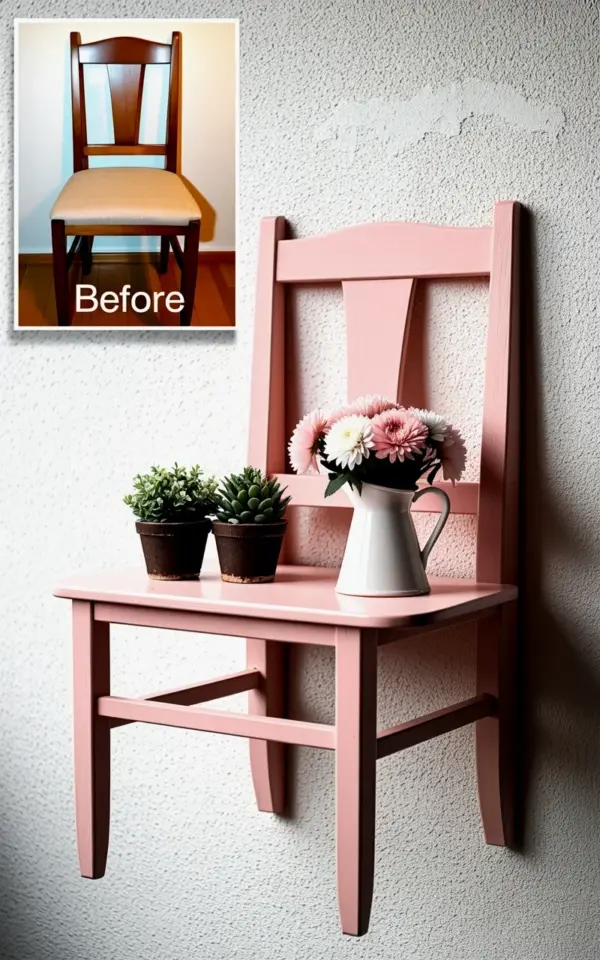
If you have been browsing spring garden decor ideas on a tight budget, this repurposed chair wall shelf might be exactly what you need. I turned an old wooden chair into a repurposed chair wall shelf for my spring garden decor, and the transformation is both simple and striking. The soft pink paint and fresh flowers in a white pitcher bring life to the textured stucco wall, while the inset shows the original beige chair. This project adds vertical interest to any outdoor space and costs very little if you already have an old chair and some leftover paint.
Why I Chose to Repurpose a Chair for a Wall Shelf
I had an old wooden chair with a beige cushioned seat sitting in my garage for months. It was too wobbly to sit on but too solid to throw away. Instead of buying a new wall shelf, I decided to give the chair a second life. Repurposing furniture saves money and reduces waste. Plus, a chair has a natural shape that works surprisingly well as a mounted shelf. The curved back and sturdy legs create shallow ledges for pots, pitchers, or books.
For this project, I wanted something that would pop against my white stucco wall. A soft pink paint (from the clearance rack at my local hardware store) cost me under five dollars. The entire project, including plants and a thrifted pitcher, came to about fifteen dollars total. That is the kind of budget-friendly makeover that makes spring decorating feel guilt-free.
How to Prepare an Old Chair for Mounting
Before you start, inspect your chair. You want one with a solid back and legs that can hold a little weight. The chair in the photo had a beige fabric cushion that I removed. I simply unscrewed the seat cushion and set it aside (you could reuse the foam for another project).
Next, sand the wood lightly with medium-grit sandpaper. This helps the paint stick. I wiped away all dust with a damp rag. If your chair has any loose joints, add wood glue and clamp them overnight. A stable base is important because the wall shelf will hold pots and water.
- Remove cushion or seat – unscrew or pry off carefully.
- Sand the wood – focus on rough spots and old varnish.
- Tighten joints – use wood glue and clamps if needed.
- Clean with a damp cloth – let dry completely before painting.
- Choose outdoor paint – I used satin latex in a soft pink.
Painting Tips for Outdoor Furniture Upcycles
Since this shelf would live outside on a covered porch, I needed paint that could handle humidity and occasional sun. I used a satin latex paint labeled for exterior use. The color is a muted blush pink with a hint of peach. It softens the look and does not compete with the flowers.
I applied two thin coats using a small foam roller for the flat parts and a brush for the crevices. Drying time between coats was about two hours. If you want a distressed look, you can lightly sand edges after the paint dries. I kept mine smooth, but a little texture on the stucco wall adds contrast.
One practical tip: seal the paint with a clear outdoor sealer if your shelf will face rain. My stucco wall is under a slight overhang, so I skipped that step. But for full exposure, a matte sealer adds durability without changing the color.
Mounting a Chair as a Wall Shelf Safely
Mounting the chair requires a bit of careful measuring. I decided to attach the chair horizontally with the back legs against the wall. The seat area becomes the main shelf surface, and the top rail of the back acts as a small ledge for a secondary pot.
First, find the studs in your wall. For a heavy chair, use at least two screws into studs. I used heavy-duty toggle bolts for the parts that hit drywall. Mark where the chair back will sit on the wall. Then pre-drill holes through the chair back and into the wall. I used two long screws (3 inches) with washers to secure the chair firmly. Make sure it is level before tightening.
If you are unsure, you can also mount a small wooden cleat to the wall and then hang the chair on it. That method works well for very heavy chairs. For my lightweight chair, direct screws held fine. Test the strength by gently pressing down on the seat before adding decor.
Styling Your Repurposed Chair Shelf for Spring
Now comes the fun part: arranging the plants and accents. In the photo, I placed two small potted plants in dark brown containers on the main seat. A white ceramic pitcher filled with pink and white flowers sits at one end. The pitcher adds height and a pop of color. I also tucked a small trailing ivy pot on the upper rail so it drapes down a bit.
When styling, think about balance. Heavier items should go toward the back or the sides that are closest to the wall fasteners. Lighter items can sit forward. I prefer odd numbers of elements (three pots or a pot and a pitcher) for a natural look. Mixing textures is also nice: the matte ceramic pitcher against the smooth painted wood, plus the glossy leaves of the plants.
For spring, use fresh flowers that match your paint color. Pink tulips, white daisies, or even faux flowers work well. If you choose real flowers, use a watertight container like my white pitcher. Change the water every few days to keep them fresh.
Budget Options for Plants and Containers
You do not need expensive pots to make this shelf look beautiful. My dark brown containers came from a dollar store. I painted them with leftover pink paint for a cohesive look, but the plain brown works fine with the soft pink. The white pitcher was a thrift store find for two dollars. Look for small ceramic vases, tin cans wrapped in twine, or even mason jars.
As for plants, succulents are cheap and low-maintenance. A small sprig of ivy from a friend will root in water quickly. Pansies and violas are affordable spring annuals that bloom for weeks. You can also use dried flowers or preserved moss for a no-water option.
Before and After: The Real Difference
The inset in the photo shows the original beige chair with its plain wooden frame and worn cushion. It looked like something you would ignore at a flea market. After sanding, painting, and mounting, the same chair becomes a charming garden accent. The soft pink reads as fresh and intentional against the white stucco. Friends who saw the before picture did not believe it was the same piece.
That is the beauty of upcycling. You take an object that has lost its original purpose and give it a new one. This chair wall shelf now holds flowers and draws the eye upward in my small garden corner. It cost almost nothing, took an afternoon, and makes me smile every time I walk past it.
If you have an old chair gathering dust, consider this project. The process is straightforward, and the result adds a personal touch to your spring garden decor. Try it yourself, and feel free to share your own before and after photos. I would love to see how you make it your own.
#repurposedchair #diyfurniture #springgarden #wallflowershelf #upcycleddecor
Leave a Comment