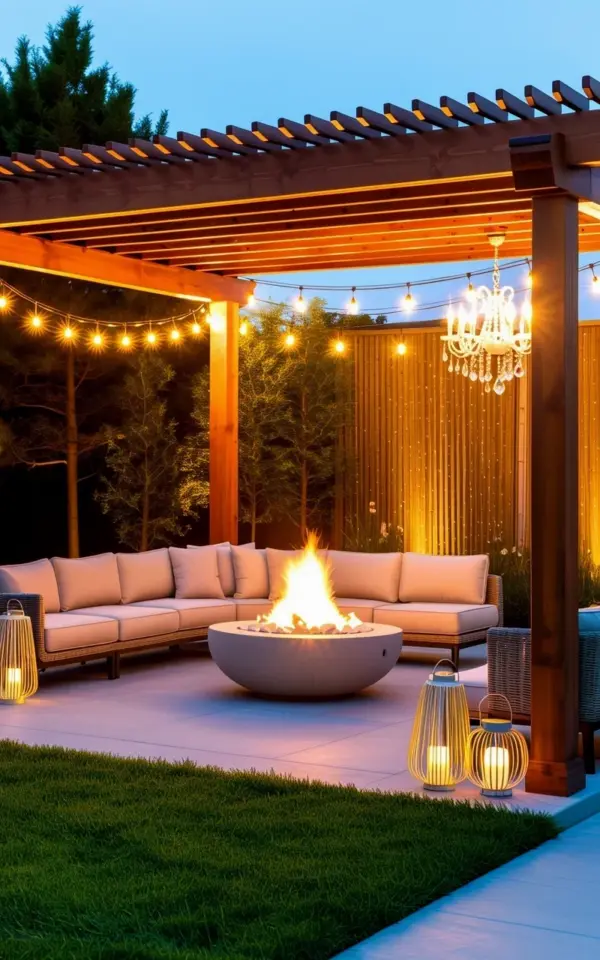
You know that sinking feeling when you scroll through Pinterest and see an outdoor patio setup so perfectly cozy that your own backyard suddenly looks like a sad, unfinished set from a low-budget movie? I felt that exact pang the other day. A circular fire pit, a curved beige sectional, soft string lights dangling under a wooden pergola, and a tiny crystal chandelier catching the last bit of dusk. Honestly, my first thought was “yeah, that cost more than my car.” But here’s the thing: after staring at the photo for way too long, I realized almost every piece in that scene can be done on a real person’s budget. Not a “buy a whole new living room” budget, but a “I can actually afford this without selling my Kidneys” budget. So let’s break down how you can steal that look (legally) for your own yard, with affordable swaps that don’t scream “I bought the cheapest stuff on Amazon.”
Starting with the Ground: Affordable Stone Floor Options
In that dream photo, the patio floor is a light gray stone. It looks seamless and expensive. Look, I don’t know about you, but ripping up my entire lawn and pouring concrete? Not in the cards this year. Or any year. The trick is to fake it without regretting it.
Instead of real stone, try interlocking concrete pavers in a light gray tone. You can get them at big box stores for around $1.50 per square foot. Or, if you’re really pinching pennies, use a peel-and-stick stone veneer over an existing concrete slab. I tried that on a rental patio once, and it held up for two years without chipping. One weird thing: make sure you seal the pavers yourself with a $15 bottle of sealer. The color stays fresh, and you avoid that “cheap gray cardboard” look after it rains. Another option? Large format porcelain tiles rated for outdoor use. They mimic natural stone perfectly, and you can often find clearance lots for pennies on the dollar. But you’ll need to grout or use a joint compound, which is a pain. Ok so, here’s my personal favorite: a crushed gravel base with large stepping stones. Costs about 40 cents a square foot and drains like a dream. Not the same look exactly, but close enough for a fraction of the price.
Building a Pergola Without the Pergola Price Tag
The photo shows a wooden pergola with exposed beams. Wood is classic, but wood is also expensive and high maintenance. I’m not gonna lie, I bought a metal pergola kit from a major home improvement store two summers ago. It was around $400. Steel tubes, powder-coated black. It didn’t rot, it didn’t need staining, and I bolted it to my deck in an afternoon. You can get the look of those exposed beams by adding faux wood vinyl wraps to the metal frame. No one will know unless they touch it. And honestly who is touching your pergola beams?
Another budget move: build a pergola from pressure-treated lumber yourself. A simple 10×10 foot structure costs around $300 in wood and screws, plus a few bags of concrete for the posts. I did this once with a friend, and we used a saw to make notches in the beams. It took a weekend. The key is to leave the lumber raw and let it weather to a silvery gray over time, which matches that “natural” vibe in the photo perfectly. Just don’t forget to use galvanized hardware, or you’ll get rust stains within months. And for the love of all that is cozy, make sure your pergola is tall enough to walk under without ducking. Seven feet is the minimum. Eight is better. Otherwise you’ll hit your head on the chandelier. Don’t ask how I know this.
String Lights and a Chandelier: Lighting on a Shoestring
The Pinterest photo has those classic Edison bulb string lights crisscrossing the pergola. Plus a crystal chandelier hanging off one side. That chandelier caught my eye because it’s so unnecessary for a patio, and yet it works. You don’t need a $300 outdoor chandelier, trust me. I found a used indoor chandelier at a thrift store for $15. Spray-painted the whole thing with outdoor-rated spray paint (flat black, because why not) and hung it with a sturdy outdoor-rated chain. The bulbs? Just get LED flame-tip bulbs that look like candles. They’re cheap, they don’t get hot, and they give that warm, old-movie glow.
For the string lights themselves: don’t buy the tiny fairy lights. They look like spider webs. Get the big, round Edison bulb strings (the ones with the thick glass). You can find a set of 48 feet for about $25 online. Here’s the trick: hang them in a zigzag pattern, not straight lines. The uneven spacing mimics the photo’s relaxed feel. And always use outdoor extension cords with a timer switch. I plug mine into a smart plug so they turn on at sunset. That way I don’t have to remember, because I will forget. Also, if you use metal hooks to attach the lights, wrap the hook in electrical tape first. Trust me, bare metal will eventually cut the wire and you’ll be standing in the dark with a fuse box. Learn from my mistakes.
Choosing a Fire Pit That Won’t Break You
The image shows a modern circular concrete fire pit. That thing probably cost a grand. But you can get the same silhouette with a propane fire pit table from a big online retailer for around $150. Or, if you really want the in-ground look, buy a fire pit ring (a metal ring that goes inside a hole in the ground) for about $40, then surround it with cheap concrete retaining wall blocks arranged in a circle. The blocks are maybe $2 each. I built one of those in an afternoon, and it looked shockingly good. The secret is to stagger the blocks so they’re not perfectly aligned, giving it that “natural stone circle” vibe.
For a budget-friendly twist: use a solo stove style but get a generic stainless steel fire pit bowl, often under $60. Place it on a flat stone paver. Surround it with a few matching pavers, and you have a portable fire area you can move when the grass needs mowing. And please, for the love of your lawn, put something underneath. A melted patch of plastic grass is not a good look. Also, propane is cleaner than wood and you don’t have to chop anything. But wood fires smell better. Pick your priority. I use both, depending on my mood. Ok so, one more thing: if you go with a propane fire pit, buy a 20-pound propane tank refill. Not the little green camping tanks. Those run out in an hour and are a ripoff. Get the big boy.
Finding the Right Sectional Without Selling a Kidney
The curved beige sectional in the photo is the centerpiece. It looks plush and custom. But you can get that shape with a modular outdoor sofa set. I’ve seen curved L-shaped sectionals with removable cushions for under $800 on sale. That’s still a lot, but here’s a trick: buy two separate deep-seated chairs and a small loveseat, and arrange them in a gentle curve. Use a large coffee table (or a wooden spool painted gray) to anchor the grouping. That curved look is really just an illusion of careful placement. No one will notice it’s not one continuous piece because the fire pit becomes the focal point anyway.
For the fabric: choose Sunbrella or a similar performance fabric. It resists stains, mildew, and sun fade. But new Sunbrella is pricey. Check Facebook Marketplace for used outdoor furniture that needs new cushions. You can find a nice aluminum frame set for $50, then buy replacement cushions for $100. The total is still way less than a new set. And beige works great, but if you have kids or dogs, maybe a slightly darker sand color. I learned this the hard way: beige cushions plus a muddy Golden Retriever equals disaster. Look, I still love my sectional, but I keep a outdoor blanket on it now. Always. So maybe go with a warm taupe or light gray instead of pure beige. Your call.
Extra Touches That Cost Next to Nothing
The photo also shows a well-maintained green lawn beyond the patio. That’s largely just watering and mowing regularly, but you can fake a lush look with a bit of fertilizer and some patch repair. Not glamorous but it works. I also noticed the lawn in the image doesn’t have weeds. Yeah, that takes effort. But honestly, a few dandelions here and there add character. I left a patch of clover in my yard on purpose, and it stays green all summer without watering. Plus bees love it. So that’s a win.
- Add outdoor pillows with textured patterns. You can buy two sets and swap them when one gets dirty.
- Use a large metal tray on the coffee table to corral candles, a remote, and a coaster.
- Hang a small curtain or two on the sides of the pergola for a soft look. Sheer outdoor fabric is cheap and filters the sun.
- Spray paint old terra cotta pots a matte gray or warm beige to match the stone floor. Plant something easy like lavender or succulents.
- Get a few battery-operated LED candles in glass holders. No fire risk, and they flicker realistically.
One weird personal thing: I put a small outdoor rug (the kind that’s basically recycled plastic) under the fire pit area. It collects ash and dirt, but I can hose it off. My partner thinks it’s silly. I think it makes the zone feel like an actual room. So, I win.
Putting It All Together Without the Overwhelm
You don’t have to do everything at once. Start with the fire pit area. Then add the string lights. Then the pergola (or a cheap umbrella that mimics a pergola shape). Build one piece per paycheck. That’s how I did my patio, and it took two full summers. The result? Not exactly the photo, but honestly kind of better because it’s mine and it cost about $600 total. I even hung that silly chandelier inside a metal gazebo frame last fall, and it survived a windstorm. The only thing missing is the curved sectional, but I have a worn-out wicker sofa that I re-cushioned. Close enough.
So go ahead, save that Pinterest pin, but don’t let it intimidate you. You can get the look with a weekend and some smart shopping. Start with one element, maybe the string lights. You’ll be surprised how quickly it all comes together. And if you have a weird little corner you don’t know what to do with, just add a plant and a twinkle light. That’s my go-to. Now go make your backyard cozy. (And for the record, that crystal chandelier? Not a single person has noticed it’s not meant for outdoors. They just say it’s pretty.)
#outdoorpatio #firepit #pergola #backyarddecor #stringlights
Leave a Comment