Honestly, I almost talked myself out of this project. Our cinder block fire pit was fine. Functional, sure, but it just sat there in the dirt like a gray concrete island, and the whole backyard felt unfinished. Every time I looked out the window, I saw that same dull square of blocks and thought, “that could be so much better.” So one warm Saturday morning, I just decided to do something about it. Painting your cinder block fire pit is an easy weekend upgrade, and honestly, it completely changed how I feel about our whole outdoor space.
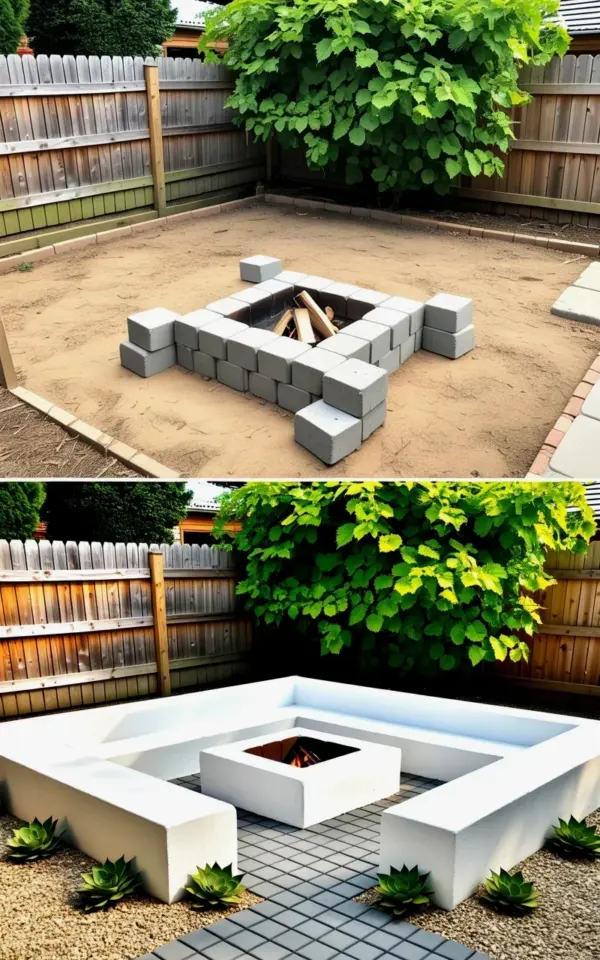
The transformation you see in the photo really happened in about a day and a half. The top image shows the problem: a bare dirt patch, a square fire pit, a wooden fence, and that one big leafy bush that we never really figured out what to do with. The bottom image is the payoff. Bright white blocks, a neat gray paver walkway, small succulents tucked in. I’m still a little shocked at how different it looks. Let me walk you through exactly what we did, what I would do differently, and how you can pull this off without losing your whole weekend.
Why Paint Cinder Blocks Instead of Replacing Them?
Because tearing out old blocks is miserable, that’s why. Seriously. Concrete blocks are heavy, they’re awkward to carry, and you have to figure out where to dump them. Keeping the existing structure saved us a ton of time and probably a few hundred dollars. Plus, a coat of masonry paint covers a multitude of sins, stains, scuffs, and all the little chips that accumulate after years of weather and fire smoke.
Here’s the thing: the fire pit itself was structurally solid. It wasn’t going anywhere. Replacing it felt like a waste of good materials and good money. Painting was the perfect middle ground, it gave us the look of a brand-new outdoor living space without the back-breaking labor of a full rebuild.
Supplies You Actually Need for This Backyard Makeover
Ok so gathering supplies is the boring part, but get this wrong and you’ll be making a second trip to the store. I speak from experience. Here’s the exact list I used, with a few notes:
- Masonry paint or concrete paint: I used a bright white exterior masonry paint. It’s thicker than regular wall paint and breathes better over concrete.
- A wire brush: This is for scraping off loose mortar and dirt. Don’t skip this step, seriously. Paint won’t stick to dusty blocks.
- Drop cloths or plastic sheeting: Protect the grass or dirt around the area. I learned this one the hard way. Paint splatters are annoying.
- Good quality paint roller and brushes: Get a roller with a thicker nap, it reaches into the rough surface of the cinder blocks way better than a cheap one.
- Gravel or sand base: For laying the pavers. You’ll need a base layer to level the ground.
- Gray concrete pavers: The square ones in the photo are 12×12 inches, I think they’re perfect for this space.
- A level: Trust me, your pavers will look crooked if you don’t use one. And a crooked walkway is worse than no walkway.
- Potted succulents or small plants: The finishing touch. They soften the hard edges and add life.
How to Paint Cinder Blocks for an Outdoor Fire Pit
Let me tell you, the prep is ninety percent of the work. If the surface is dirty, the paint will peel, and then you’ll be furious. Start by sweeping and wiping down every block. Then, hit the surface with a wire brush to knock off any loose flakes or mortar. Don’t worry about it looking perfect, you just need a clean, stable surface for the paint to bond to.
Now, here’s a pro tip I wish I had known before I started: wait for a dry day with no rain in the forecast. Paint needs at least 24 hours to fully cure on masonry. If moisture gets trapped underneath, it creates bubbles under the paint. Not a good look. Also, use a primer first. I almost skipped this, but the paint on raw concrete never looks as vibrant or even without a good masonry primer.
When you actually start painting, don’t try to do one thick coat. Instead, use two thin coats, like you’re painting a wall. The first coat will look patchy and awful, that’s normal. Wait for it to dry completely, that takes a few hours, then apply the second coat. The white will look crisp and clean by the second pass. Use a brush for the inset holes of the cinder block and a roller for the flat surfaces. It takes longer, but the result is way more polished.
How to Lay Pavers Around a Fire Pit Like a Pro
Once the paint was dry, I moved on to the paver walkway. Painting the cinder block gave us a solid visual anchor, but the pavers did the heavy lifting of making it feel like a real outdoor living area. In the photo, you can see the boards are laid flush around the perimeter of the pit, creating a border and a walkway. It’s not complicated, but it does require attention to detail.
We started by outlining where the pavers would go. Since the ground was just dirt, we had to excavate about two inches down to create a stable base. It’s dusty, sweaty work, but it’s simple. Then, we filled the area with a layer of leveling sand or gravel and tamped it down hard. The sand gives you a flat surface to work on, so you don’t have a wobbling paver. It’s a forgiving material, you can move it around to fill in low spots.
Lay the pavers one by one, checking with a level as you go. It’s okay if it’s not completely perfect, no one will be measuring your handiwork at a backyard party. Here’s a weird little detail: we actually used sand between the cracks to lock them in place. You just sweep it over the top and let it settle into the gaps. It’s cheap, looks neat, and keeps the pavers from shifting under foot. Anyway, once they’re down and level, you’ll feel like a legitimate contractor, not gonna lie.
Adding Succulents and Softening the Edges
The pavers alone felt a little severe, a lot of hard lines and straight edges. The photo shows small potted succulents tucked strategically between the pavers. That was the smartest move we made. They break up the symmetry just enough so the space feels designed and organic, not like a parking lot. Look, you don’t need a green thumb for this. Succulents are basically designed to be ignored. They want a sunny spot and very little water. Perfect for beginners.
You can go wild with colors here. The photo shows muted greens and grays, which fits perfectly with the white blocks and gray stones. I picked up a few assorted succulents from the local garden center, honestly, I just grabbed the ones that looked the most interesting. I kept them in their pots and just set them in the gaps between the pavers. That way, I can swap them out in the winter or move them around when I want a different look. It’s flexible, zero commitment.
My Best Tips for a Cinder Block Fire Pit Makeover
Every project has its little lessons. The stuff you only learn by doing. For this one, I have a few pieces of practical advice that will save you time and frustration:
- Use a dedicated masonry drill bit if you need to do any patching or cleaning first. Regular bits just spin and skip off the concrete.
- Check your local fire codes. Some places require a certain distance between the fire pit and any structure, like your fence or house. It’s a boring detail, but it keeps you legal.
- Keep the paint wet on the roller. It dries fast on hot surfaces and can leave streaks or clumps if you’re too slow.
- Don’t be afraid to rearrange the pavers twice. It takes three seconds to lift one up and put it down somewhere else, so get the layout right before you commit to the sand.
Also, consider the gravel and soil you’re working with. If you have really sandy soil, you might need a heavier base layer. If your yard is clay-heavy like mine was, the drainage is awful. I ended up adding a little extra sand just to make sure water didn’t pool on the walkway after a storm. Nobody wants to step off the pavers directly into a puddle of mud.
Does Painting a Fire Pit Make It Fireproof?
I’m glad you asked. The short answer is no. The paint is for looks, not for heat resistance. Here’s the thing though: the walls of a cinder block fire pit don’t actually get as hot as the fire itself. The heat goes up into the air. The blocks do get warm, certainly, but they won’t catch fire and they won’t melt. That said, if your fire pit is really small and you’re building raging bonfires right against the sides, you might get some discoloration. The white paint could tan or yellow a little over time near the bottom, which I actually think gives it character. It’s a lived-in piece of furniture now.
Just use standard exterior masonry paint and don’t worry about specialty “fire-rated” paint. In my experience, that stuff is overpriced and hard to find. Standard paint holds up just fine on the exterior. It’s meant for sun, wind, and heat. You’re not painting the inside of the pit, that’s the key. Keep the paint on the exterior surfaces. If a stray log falls against the wall and leaves a scorch mark, you can just repaint that section. It’ll take you five minutes.
Time to Save This Fire Pit Idea
This whole project took us about six hours of actual work spread over a weekend. Honestly, the hardest part was just waiting for the paint to dry. But the result is exactly what you see in the photo: a bright, clean backyard that feels intentional. The bright white blocks make the fire pit the center of attention, even when there’s no fire burning. The gray walkway makes it feel connected to the rest of the yard, and the succulents add that little bit of nature back. It’s a budget-friendly fire pit makeover that completely changes the backyard vibe. I’ve had neighbors stop by just to ask what we did.
Anyway, if you have a sad, neglected cinder block pit in your yard, I really hope you give this a try. You don’t need to be a professional. You just need some paint, a level, a few pavers, and a free Saturday. Save this post for your next outdoor project. If you try it, let me know how it goes, I’d love to hear about your own version of this transformation.
#CinderBlockFirePit #BackyardMakeover #DIYYard #FirePitIdeas #OutdoorDecor
Leave a Comment