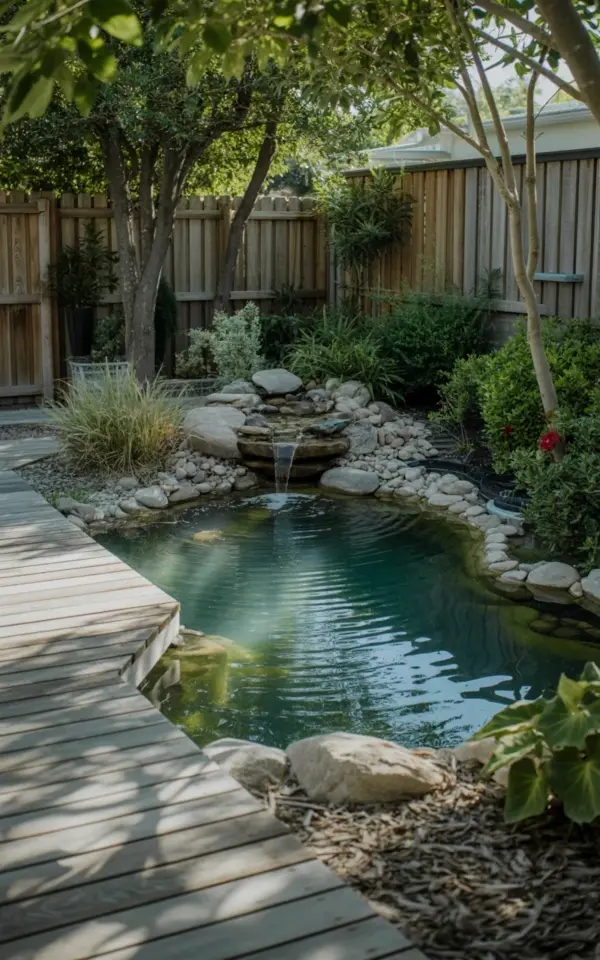
There is something about a backyard pond with a gentle waterfall that instantly makes a space feel like a private retreat. I have spent many afternoons sitting on a light wooden deck, watching the clear turquoise water ripple over river rocks, listening to the soft cascade while ornamental grasses sway in the breeze. If you have ever dreamed of building a natural water feature like this, you don’t need a huge budget or a team of landscapers. You just need a few practical steps, some patience, and a willingness to get your hands dirty. This guide walks you through the process, from choosing the right spot to planting the final greenery.
Why Choose a Natural Pond with a Waterfall?
A natural pond does more than just look pretty. It creates a microclimate that cools the surrounding air, attracts birds and dragonflies, and gives you a reason to slow down. The sound of falling water masks traffic noise and neighbor chatter, turning your yard into a secluded oasis. Adding a small waterfall also keeps the water moving, which helps prevent algae from taking over. In my own experience, the combination of a curved pond, a wooden deck, and a privacy fence makes the space feel like a hidden garden room. You get all the benefits of a water feature without it feeling artificial or overly manicured.
Step 1: Plan Your Pond Shape and Location
Before you dig, think about where the pond will sit. You want an area that gets partial sunlight, not full all day, because too much sun can lead to green water. A spot near a privacy fence or a wall works well, as it gives you a backdrop for the waterfall and helps contain the sound. The shape should feel organic. Forget perfect circles or rectangles. Instead, use a garden hose or rope to outline a gentle curve on the ground. In the photo that inspired this guide, the pond has a natural, sweeping curve that fits right into the landscape. Mark the perimeter with spray paint, then step back and adjust until the shape feels right. Keep the depth at least 18 to 24 inches in the center to give fish or plants enough room.
Step 2: Install the Pond Liner and Base
Once you have your shape, dig down about 6 to 8 inches for the shallow shelf that will hold rocks and marginal plants, then go deeper for the main basin. Remove any sharp stones or roots. Line the hole with a layer of sand or old carpet underlayment to protect the liner. For a natural look, choose a black or dark gray EPDM rubber liner. It is flexible, durable, and blends into the soil. Drape the liner loosely, then fill the pond slowly with water. As the water fills, smooth out wrinkles by pulling the edges gently. Do not cut the liner yet. Let it settle for a day, then trim the excess, leaving a 6 inch border around the edge to be hidden by rocks and soil.
- Pro tip: Use a level to check that the pond edges are even. If one side is higher, water will spill out when it rains.
- Material list: EPDM liner, underlayment, pond pump, tubing for waterfall, and a preformed spillway or a flat rock for the waterfall lip.
- Safety: If you plan to have a wooden deck right at the edge, make sure the liner extends well past the deck foundation so roots don’t puncture it later.
Step 3: Build the Waterfall and Rock Edging
This is where the pond starts to feel natural. For the waterfall, stack large, flat stones behind the pond to create a raised bed. Use a small pump with a flow rate of at least 500 gallons per hour for a gentle cascade. Run the tubing from the pump up behind the rocks, then hide it with smaller stones. Place a large, flat spillway rock at the top so the water spills evenly. In the photo, the waterfall cascades over gray river rocks into the pond, creating gentle ripples. Arrange the rocks loosely, tilting them slightly toward the pond so water flows forward. Do not cement everything. Loose stacking allows for adjustments and easier maintenance. For the pond edges, place the largest rocks first, overlapping the liner. Fill gaps with smaller stones and pea gravel. This hides the liner completely and gives a stream bed look.
Step 4: Add the Wooden Deck and Seating Area
A light wooden deck that leads right to the pond edge transforms the feature from something you look at to something you sit beside. I recommend pressure treated pine or cedar for durability. Keep the deck low, just a few inches above the ground, so it feels like an extension of the grass. In the image, the deck has light brown planks with tree shadows falling across it. That happens naturally if you place the deck near existing trees, but you can also add a small pergola or umbrella for dappled shade. Make sure the deck sits at least 6 inches away from the pond liner to prevent water wicking up into the wood. Use deck screws rather than nails, and seal the wood with a clear water repellent to protect it from moisture. If you like the look of the photo, leave the deck unstained for a natural, weathered finish.
Step 5: Plant the Surroundings for a Secluded Oasis
Lush greenery softens the edges of the pond and makes it feel like it has always been there. In the photo, ornamental grasses and flowering plants frame the water, while the privacy fence provides a solid green wall. Start with tall grasses like feather reed grass or blue fescue along the back edge to hide the fence. Add low growing plants like creeping Jenny or dwarf mondo grass near the waterline to creep over the rocks. For color, throw in a few perennial flowers such as Japanese iris or cardinal flower. They thrive in moist soil and attract pollinators. Leave a gap between the plants and the deck so you can walk right up to the water. Mulch the beds with river pebbles or bark chips to reduce weeds and keep the look cohesive. Do not overplant. Let the rocks and water stay the main focus.
Maintenance Tips for Clear Turquoise Water
That clear turquoise color you see in the photo is not magic. It comes from a combination of good filtration, balanced plants, and regular upkeep. Run the pump and waterfall at least 8 hours a day during warm months. Add a small biological filter or use a foam pre filter on the pump intake. Introduce floating plants like water lilies or water hyacinth. They shade the water and soak up excess nutrients. Remove fallen leaves weekly, especially in autumn, to prevent them from decomposing and turning the water brown. If you notice algae, add barley straw pellets or a UV clarifier. But the simplest trick is to keep the water level consistent. Top off the pond every few days with a garden hose. Dechlorinator drops are cheap and safe for fish and plants. Once a month, rinse the pump and check the tubing for clogs. A little routine goes a long way toward keeping that inviting clarity.
Building a natural backyard pond does not have to be a massive project. Start small, choose a curved shape that fits your yard, and let the rocks and plants do the heavy lifting. Whether you build a simple liner pond or add a wooden deck like the one in the photo, you will end up with a spot that feels miles away from the daily rush. Grab a cold drink, sit on the edge of your deck, and listen to the waterfall. That is the real reward.
If you enjoyed this guide, pin it to your garden design board and share your pond progress with a friend. Happy digging.
#BackyardPond #Waterfall #DIYPond #GardenDesign #OutdoorOasis
Leave a Comment