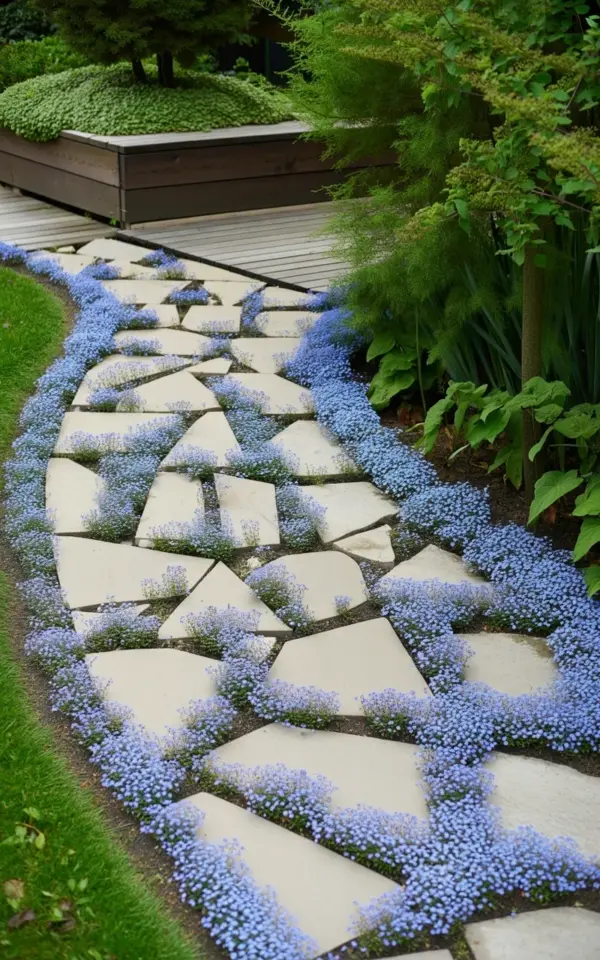
Picture this: a ribbon of light beige stone cutting through a bed of electric purple-blue blooms, each paver sitting like a puzzle piece surrounded by a sea of tiny flowers. This is the gardenpath that stopped me mid-scroll, the one I saved and recreated in my own backyard last spring. I stood in my garden center staring at a pallet of irregular geometric pavers, wondering if I could pull off the same lattice effect I saw in that photo, and honestly, the results surprised me.
The magic in that image isn’t just the stones, it’s the way the forget-me-nots completely swallow the gaps between them. The dark wood retaining wall behind it all grounds the scene, giving the soft, airy flowers something solid to lean against. If you’re actively planning a stone walkway and want something that feels less like a utility path and more like a living part of your garden, this design is worth copying. Let me walk you through how I handled mine, what worked, and what I would absolutely do again.
## Designing the Geometric Lattice Pattern for a Stone Pathway
The key to this look is choosing pavers that are irregular but still read as geometric. I found a set of trapezoid and triangle-shaped concrete pavers in a warm, light beige tone. You want stones that have straight edges but different angles, so they fit together like an abstract mosaic rather than a uniform grid.
Lay the pavers out on the excavated soil before you commit to anything. I spent a good hour shifting mine around, trying different rotations, until I got that organic lattice feel. The gaps between the stones are just as important as the stones themselves. I left spaces anywhere from three to six inches wide, which felt huge at first, but those gaps are exactly where the forget-me-nots will live.
You do not need a perfect pattern here. In fact, a pattern that is slightly off, where one paver juts out a little or a gap widens unexpectedly, looks more natural once the flowers fill in. I started overthinking the layout, but my neighbor pointed out that the original inspiration photo looked random, not symmetrical. That was the permission I needed to just toss the stones down and see where they landed.
## Why Forget-Me-Nots Are the Perfect Filler for Walkway Gaps
Forget-me-nots are the real stars of this walkway, and I cannot recommend them enough for filling stone gaps. They are low-growing, they self-seed easily, and they create that thick carpet of color you see in the photo. The tiny flowers are a vivid blue-purple that pops beautifully against light beige stone.
Here is the thing: they bloom in the late spring and early summer, then they die back as the weather warms. That means your pathway has a spectacular show for a few months, then a soft green mat for the rest of the season. I was a little worried about bare dirt patches after they faded, but the foliage stayed green and mounded, which kept the walkway looking full.
They are also forgiving. Forget-me-nots will grow in partial shade or full sun, and they do not seem to care much about soil quality. I planted tiny starters in the gaps in early April, and by early May, the spaces were completely obscured by a blanket of blooms. It was exactly the flower-covered walkway I wanted.
## Installing the Retaining Wall and Garden Border for Visual Contrast
The dark wood retaining wall in the background of the original photo is doing way more work than you might realize. It provides a strong horizontal line that contrasts with the looser, organic curves of the flowers. I built a simple retaining wall using dark brown landscape timber, which was a weekend project that didn’t require any special skills.
You can also achieve this contrast with a dark painted fence or a row of dark planters. The point is to give your eye a place to rest behind the busy, colorful foreground. I added a border of lush hostas and ferns along the right side of the path, mimicking the green foliage you can see in the photo. This softens the hard edge of the timber and makes the whole area feel enclosed and lush.
One thing I learned: level the retaining wall before you set the pavers. If the wall is off, the path will look wonky no matter how pretty the flowers are. I checked mine with a long level and had to shim a few of the lower timbers, which was annoying, but the finished look was worth it.
## Practical Tips for Building a Flower-Covered Stone Walkway
Getting the planting layer right requires a little preparation, or the weeds will take over before the forget-me-nots ever get a chance. Here is what I suggest, based on my own trial and error:
– Lay down a weed barrier fabric underneath the entire path, then cut small “X” slits where you want to plant the forget-me-nots. This blocks grass and dandelions so your flowers are the only thing growing there.
– Use a mix of potting soil and topsoil to fill the gaps, pressing it firmly around the pavers so the stones don’t wobble. I used a hand tamper for this and it made a huge difference in stability.
– Water deeply right after planting, then let the forget-me-nots do their thing. They need consistent moisture for the first few weeks, but after that, they are remarkably drought-tolerant.
I also recommend edging the path with larger stones or a steel border to keep the soil from spilling onto your lawn. The grass will inevitably creep into the gaps, and fighting that every weekend is exhausting. A solid edge saves you hours of weeding, I promise.
## Maintaining the Walkway and Encouraging Seasonal Self-Seeding
The best part about forget-me-nots is that they return every year on their own. They drop thousands of tiny seeds after flowering, and those seeds will happily sprout in the same gravel and soil gaps the following spring. I do practically nothing to maintain the flowers. I just let them shed their seeds and wait for the next season.
In mid-summer, I will trim back any foliage that gets too leggy, just a quick haircut with garden shears. This keeps the path looking tidy even when the blooms have faded. The pavers themselves need a good rinse with the hose now and then, mostly to remove any accumulated leaf litter or mud stains.
As for the stones, they can shift over the winter if you live somewhere with heavy frost. I had one paver settle about an inch lower than the rest, and it was a simple fix to lever it up and add more sand underneath. Check the path in early spring before the flowers emerge, and level any wobbling pavers while you can still see them.
## Adding the Finishing Touches to Match the Original Inspiration
The lush green foliage border makes such a difference to the overall design. I planted a mix of ferns, astilbe, and a climbing hydrangea against the dark timber wall, which echoes the vines in the photo and softens the whole backdrop. These plants thrive in the same conditions as the forget-me-nots, so the whole garden bed feels harmonious rather than piecemeal.
Another detail I added was a slight curve to the path entrance, even though the main layout was largely straight. This draws the eye inward and makes the walkway feel more mysterious, like an outdoor living space that has a secret at the end. The forget-me-nots spill over the edge of the pavers, which creates a soft, romantic boundary that you won’t get with concrete edging.
I find myself using this path every single day just to walk to the back gate, even when I don’t need to go anywhere. That is the real measure of a successful garden path. It invites you out, it slows you down, and it gives you something to look at with every single step. Try this design if you’re ready for a walkway that is less about getting from point A to point B, and more about stopping mid-step to look at the flowers at your feet.
Leave a Comment