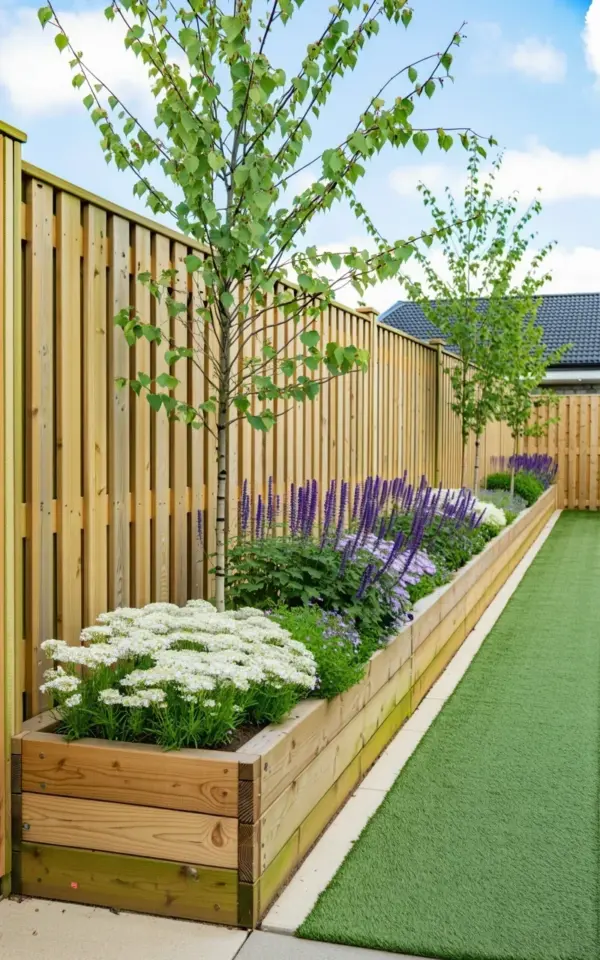
I snapped this photo on a calm afternoon last spring, right after I finished planting the last purple salvia. Honestly, I stood back and just stared at it for a minute. The long wooden planter box against the fence, the white flowers catching the light, the young birch tree swaying overhead. That was the moment I knew my garden border idea had finally clicked. This is not a design magazine spread. This is my actual fence line, a concrete path, and some artificial turf that my dog has already drooled on three times. And it works.
Why a Long Wooden Planter Box Works for Modern Garden Borders
Look, I tried those little round pots. I tried digging a trench along the fence. Nothing gave me the clean lines I wanted until I built this planter box. A long timber box runs parallel to the fence and creates a defined edge between the plants and everything else. No weeding along a messy border. No grass creeping into the flowerbed. The box itself is just natural wood, no stain, because I like the way it weathers to a soft grey over two years. Not gonna lie, I built it a bit too narrow the first time. Twelve inches wide is my minimum now, eighteen if you want to pack in more salvia. The key is to keep the depth consistent so the roots have room to spread without hitting the fence.
Here’s a weird thing I noticed. The concrete path right next to the planter reflects heat in the afternoon, and the salvia loves that. My white flowers do fine, but the purple salvia practically glows. Who knew concrete could be a plant’s best friend?
Choosing the Right Plants: Purple Salvia and White Flowers
I am not a botanical purist. I pick what survives my forgetfulness. For the white flowers, I went with a mix of white impatiens in the shadier spots and white petunias where the afternoon sun hits harder. The impatiens stay compact and neat, the petunias spill over the edge a little. Both bloom from May until a hard frost. The purple salvia I use is the perennial variety, Salvia nemorosa ‘Caradonna’. It sends up tall spikes of deep violet that keep coming back if you deadhead them. Honestly, deadheading is tedious, so I just let some of them go to seed and the birds enjoy it. The contrast is classic, yes, but what makes it work in this specific setup is the bloom timing. The salvia spikes rise above the white flowers, so you get this bi-color layer without fighting for space.
- White petunias – great for sun, but they get leggy by August. I cut them back hard once. That works.
- White impatiens – perfect for the shaded ends of the box. They bloom nonstop if you water regularly. Set a timer.
- Purple salvia – the backbone of the whole border. It is tough, drought tolerant after establishment, and bees go nuts for it. I mean, really nuts. One afternoon a bumblebee got trapped in my hair. Not my favorite memory.
Adding Height with a Young Birch Tree
Every garden border needs something vertical. I tried a trellis, but it felt too busy against the fence. Then I planted a young birch tree right in the planter box. Not a huge one. I chose Betula pendula, the silver birch. It stays narrow for years and has that delicate, shimmery foliage that moves in the slightest breeze. The birch does not need much room if you keep it pruned. I cut off the lower branches to keep the trunk visible, so the planter feels like a miniature woodland edge. Here’s a tip nobody told me: birch roots spread laterally near the surface. I installed a root barrier inside the planter to stop them from competing too hard with the salvia. The tree also drops small leaves that fall into the planter, which decompose into free mulch. I let them lie.
The Practical Side: Concrete Path and Artificial Turf
I am not a high-maintenance gardener. Ok so the concrete path is my favorite part of the whole setup. It runs right alongside the planter box, a simple poured slab that cost maybe sixty dollars in materials. I did it myself on a Saturday, and it came out slightly crooked. That bothers me less than weeds. You can walk on it in muddy shoes, hose it off, and it stays clean. On the other side of the path, artificial turf sits flat against the soil. I chose a mid-range brand with a realistic green, not that neon plastic look. The turf needs no mowing, no watering, and it keeps the area dry after rain. My dog runs on it, drags mud onto the concrete, and I just sweep it back. The contrast between the rough concrete, the fake grass, and the organic planter is exactly what I wanted. It feels intentional, not chaotic.
Building Your Own Timber Planter Box: A Simple DIY Approach
I built mine from pressure-treated pine because it is cheap and lasts. The dimensions: eight feet long, eighteen inches wide, sixteen inches tall. I screwed the sides together with galvanized deck screws, no fancy joinery. Then I lined the inside with landscape fabric to keep the soil in and rot out. A word of warning: do not let the fabric touch the wood directly against the ground. I left a one inch gap at the bottom for drainage. Honestly, I drilled too many drainage holes and then regretted it when the soil washed out. Six half inch holes spaced along the bottom is plenty. Fill the bottom with a few inches of gravel, then a high quality potting mix. The birch tree went in first, then the salvia, then the white fillers. It took me an afternoon. Two if you count the time I spent untangling the hose.
Layering Bloom Heights for Visual Impact
Not gonna lie, I just placed the tallest plants in the back and the shortest in the front. That is the whole trick. The birch tree gives a high canopy, the salvia spikes reach about two feet tall, and the white flowers stay low at maybe ten inches. If you want more of a middle layer, toss in a few white cosmos. They grow to about three feet and wave above the salvia. I tried that one year, but the cosmos blew over in a storm. Now I stick with the three layers. Birch, salvia, white low growers. It works because the eye moves naturally upward and then the white flowers anchor the base. The concrete path and turf create a hard horizontal line that contrasts with all that vertical growth. That is what makes the photo look so clean. You could replicate this in a weekend with a trip to the lumber yard and a nursery. Just measure twice, cut once, and watch for bumblebees.
Maintenance Tips for a Low-Maintenance Border
I water the planter every two days in summer, unless it rains. The artificial turf needs nothing. The concrete path gets swept once a week. That is it. Seriously. The biggest chore is trimming back the salvia after the first bloom to encourage a second flush. I cut the flower stalks down to the foliage with a pair of garden shears. Takes fifteen minutes. The white petunias might need a trim if they get leggy, but you can also just let them trail over the box edge. It looks a bit wild, but in a good way. I also top up the mulch in the planter once a year. I use shredded bark, not the big chunks. Little bits break down faster and feed the soil. Honestly, the most annoying part of this whole setup is that the birch tree drops tiny catkins in spring that stick to the artificial turf. I blow them off with a leaf blower. First world problem, I know.
So here is the honest takeaway. You do not need a landscape architect or a huge budget. You need a long wooden box, some purple salvia, a few white flowers, and a young tree that makes you happy. The concrete path and fake grass are optional, but they do make the whole thing look deliberate and clean. If you are hesitant, start small. Build a four foot planter. Plant one salvia. See how it feels. Then add the birch. Then stand back and take a photo. Mine sits on my phone as a screensaver now. It reminds me that even a messy backyard can become something simple and beautiful, if you just draw a straight line and fill it with life.
#gardenborder #flowerbed #planterbox #purplesalvia #whiteflowers
Leave a Comment