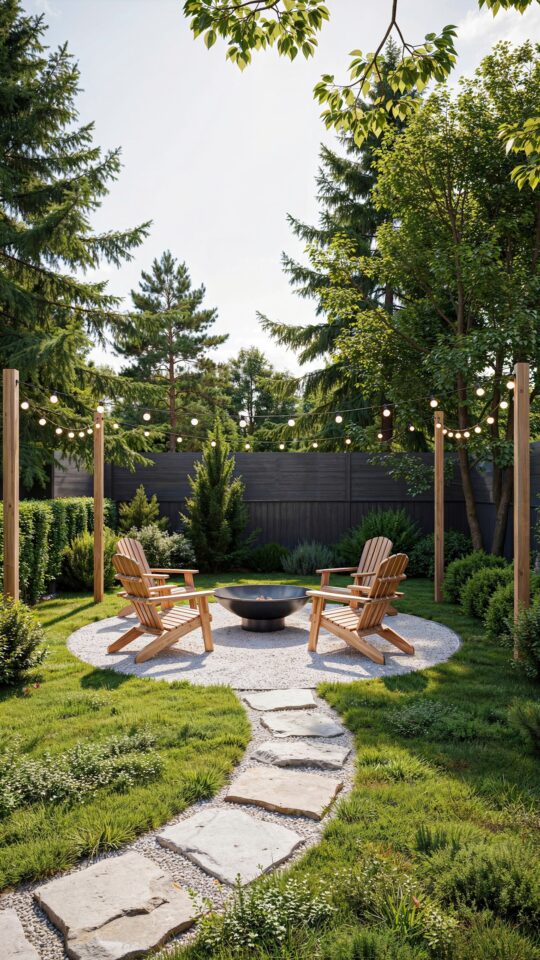
Why Planters Make the Best String Light Poles
If you have a fire pit area that needs a little glow, you might be stuck on how to hang string lights without drilling into your house or digging permanent holes. I have been there. You want warmth and charm, but you also want something you can change your mind about later. That is where planter poles come in. Using heavy planters as bases for wooden posts gives you a sturdy, movable lighting solution. You can shift them around your fire pit area depending on where you are sitting or how the wind blows. Plus, they double as decor. You can fill the planters with flowers, herbs, or even small evergreens to match the season.
This DIY outdoor decor idea is built for beginners who have never held a drill or mixed concrete. I promise, if you can plant a flower, you can build these poles. The whole project takes an afternoon, and you will end up with a custom backyard lighting setup that feels intentional and cozy. No more tripping over extension cords or squinting at the dark. Let me walk you through every step.
What You Need for Your DIY String Light Poles
Before you start, gather your materials. I like to lay everything out on the driveway so I do not have to stop mid-project. Here is a simple list that covers the basics. You can find most of these at a hardware store or big box home center.
- Two to four large plastic or ceramic planters (12 to 16 inches wide at the top, at least 12 inches deep). Heavier is better for stability.
- Pressure treated 4×4 wooden posts (8 feet tall works well for most patios; you can cut them shorter if needed).
- Quick set concrete mix (one 50 pound bag per planter is usually enough).
- A bucket for mixing concrete, a trowel, and a stirring stick.
- Gravel or small stones (for drainage at the bottom of each planter).
- String lights (I prefer warm white LED bulbs for a soft glow that does not attract bugs).
- Screw hooks or zip ties to attach the lights to the posts.
- A level, a tape measure, and a pencil.
Do not worry if you have never mixed concrete before. The quick set kind only needs water, and it hardens in about 30 minutes. That is plenty of time to get each post straight.
Step by Step: Building a Planter Pole Base
The key to this whole project is making sure the post stays upright inside the planter. Start by putting a 2 inch layer of gravel in the bottom of each planter. This helps with drainage and adds weight. Then place your 4×4 post in the center. Hold it plumb while you pour the dry concrete mix around it. I usually pour about halfway up the planter, then add water according to the package instructions, and stir with a stick. Then I fill the rest of the planter with dry mix and add more water on top. It sounds messy, but it works.
Once the concrete is in, use your level to check that the post is straight. Brace it with a couple of heavy bricks or a stack of firewood while it sets. I usually let it cure for at least 24 hours before attaching anything to the post. If you are in a hurry, some concrete mixes say they are ready in a few hours, but waiting a full day makes it much safer for holding lights.
How to Position Your Planter Poles Around the Fire Pit Area
Now comes the fun part. You get to decide where the poles will stand. For a typical fire pit area, I recommend placing them evenly around the perimeter. For a small circle, two poles on opposite sides work fine. For a larger space, use three or four posts. The goal is to create a clear path for the string lights to hang overhead. Measure the distance between each pole so your string lights will reach without sagging too low.
I like to mark the spots with chalk before moving the planters. That way I can adjust the arrangement without lifting heavy posts. Also consider where people will sit. You do not want a pole right behind someone’s chair. Leave at least 2 feet of clearance between the poles and the fire pit itself. Better safe than sorry with heat and sparks.
Hanging Your String Lights for a Cozy Backyard Lighting Effect
Once your poles are set and the concrete has hardened, attach screw hooks near the top of each post. I screw them in about 4 inches from the top. Then run your string lights from hook to hook. If your lights come with a plug, make sure you have an outdoor rated extension cord that reaches from the nearest pole to an outlet. I hide the cord under a rug or along the edge of a flower bed.
If your string lights are longer than the distance between poles, let them droop naturally. That droop is actually what gives the fire pit area that cozy, tavern like feel. If they are too tight, they will look more like a clothesline. Loosen them up a bit. You can also wrap the extra wire around the post to keep it tidy. For extra stability, zip tie the light cord to the hook so wind does not twist it loose.
Planting in Your Planter Poles (Yes, You Can Still Use Them as Planters)
The best part of this design is that the planter does not just hold concrete. You can plant around the post. I leave a gap of about 2 inches between the post and the edge of the planter. Fill that space with potting soil and add low growing flowers like petunias, marigolds, or creeping jenny. The greenery softens the look of the pole and makes the whole setup feel like
#firepitarea #DIYstringlightpoles #outdoordecorideas #backyardlighting #planterpoles
Leave a Comment