Why Every Fairy Garden Needs a Clear Path (Even If You Disagree)
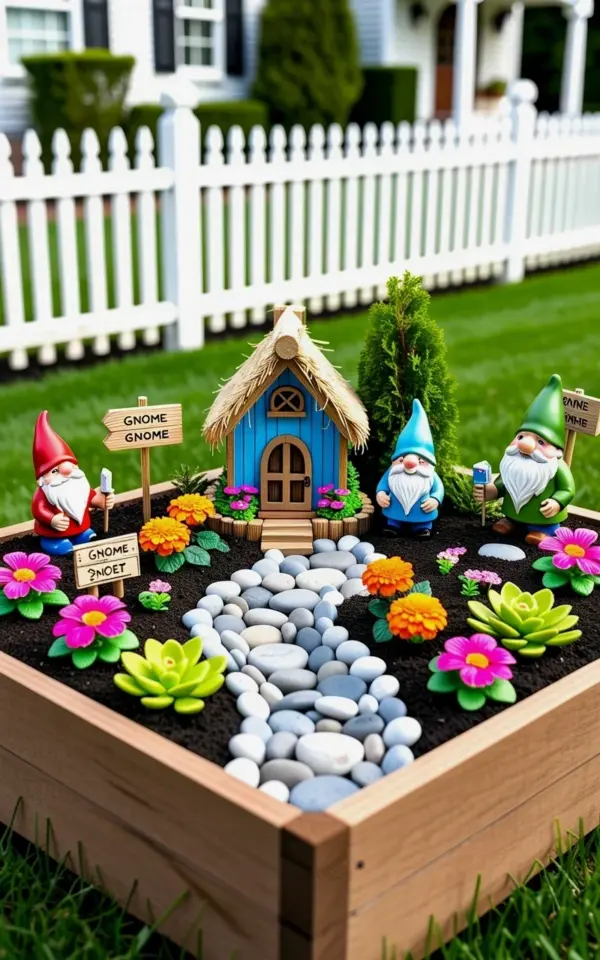
Honestly, the biggest fairy garden mistake I see over and over? No clear path. People pile up a bunch of miniatures, add a few plants, and call it a day. But look, the eye needs a journey, a little story to follow. A winding river of gray rocks pulling toward a tiny blue house changes everything. That simple line of river stones creates natural flow and stops the whole scene from feeling like a cluttered jumble. We used bright marigolds and lime green succulents around ours, and suddenly the garden felt intentional, not chaotic. Avoid that mistake and your fairy garden will feel ten times more inviting. Save this for later if you want to try it yourself.
The River Rock Path: An Instant Anchor for Your Raised Planter
Our raised bed planter had a white picket fence backdrop, dark soil, and three little gnomes (one in a red hat who looked like he was up to something). But before the path, it was just a sad collection of stuff. Once I dug a shallow trench through the soil and filled it with smooth gray and white river rocks, the whole thing snapped into focus.
The rocks aren’t just decoration. They create a visual line that leads straight to the fairy house with its thatched roof and arched doorway. And because the path curves, not goes straight, it feels like a real journey. You almost expect the gnome in the red hat to start walking it.
Here’s a weird little aside: I actually spent an extra hour sorting the rocks by size because the smaller ones kept falling into the gaps. Not gonna lie, my back hurt the next day. But the result was worth it. The path looks like a dry creek bed, which makes the fairy house feel like it belongs in a secret valley.
Stepping Stone Pathways (Because Not Everyone Loves River Rocks)
Maybe river rocks aren’t your thing. That’s fine. Try flat stepping stones instead. I’ve used broken pieces of terracotta pot before, and they give a more rustic, cottage-core vibe. Arrange them in a gentle S-curve leading from the front of the planter to the back, where your fairy house sits.
The key (okay, one key) is spacing. Leave a gap between stones so miniature plants can grow around them. Tiny thyme or moss works great. This way the pathway feels embedded in the garden, not just plopped down. And it still avoids that cluttered look because everything flows along the line of stones.
Personally, I think stepping stones work best if your fairy house is a bit elevated, like on a small hill of soil. The stepping stones become steps, and that adds depth. But honestly, even flat, they do the job.
Miniature Brick or Cobblestone Paths for a More Formal Feel
If you want a fairy garden that looks like a tiny European village, skip the natural rocks and use miniature bricks. You can buy them at craft stores, or make your own by cutting clay into small rectangles and baking them. Yes, that’s a lot of effort, but the effect is undeniably charming.
We tried a brick path once in a smaller container. It took forever to lay them evenly because my fingers are too big. But the result was a structured, almost regal pathway leading to a little cottage. The marigolds flanking it popped like little orange lanterns.
One note: brick paths work best in rectangular or square planters, not round ones. The straight lines contrast nicely with curved beds. But if you have a round planter, consider a curved brick pattern, which is more work but looks amazing. Anyway, that’s a project for another weekend.
Moss Pathways: The Soft, Secret Option
Ok so this one is a little unconventional. Instead of rocks or bricks, use sheet moss to create a path. Press it down into the soil in a winding shape, and it looks like a tiny forest trail. It’s almost like the fairies themselves laid it down.
Moss paths are fantastic because they stay soft and green, and they contrast beautifully with bright flowers. In our raised planter, we have vibrant pink flowers and orange marigolds. A moss path would be a cool, calming stripe through all that heat.
But here’s the honest truth: moss needs moisture. If your fairy garden is in full sun, moss will crisp up and look awful. So only try this in a partially shaded spot, or use preserved moss that doesn’t need water. Preserved moss isn’t alive, so it won’t grow, but it stays pretty for months. Trade-offs, you know?
Adding the Details That Make the Path Feel Lived-In
A bare path is just a line. But a path with tiny pebbles along the edges, a miniature bench nearby, or a little sign pointing toward the fairy house? That’s storytelling.
In our photo, you can see three decorative gnomes positioned throughout the garden. One sits near the start of the river rock path, another halfway, and the third by the blue house. That creates a sense of movement. If you only have one gnome, place it right where the path begins, as if inviting visitors to follow.
Also, think about scale. The river rocks we used are about the size of a fingernail. Anything bigger would make the path look like a boulder field. And the marigolds? We chose dwarf varieties so they stay proportional. Nothing ruins a fairy garden faster than a flower that’s bigger than the house. Unless you’re going for a giant flower world vibe, which I guess is a different aesthetic.
How to Avoid the Cluttered Look Without a Path
If for some reason you really don’t want a path, there are other ways to create visual flow. But honestly, they’re harder. You can arrange plants in a sweeping curve, or use color gradients (like dark green to light green to yellow) to guide the eye. Still, a path does it best.
- Use odd numbers of plants – three marigolds, five succulents, etc. It looks more natural than pairs.
- Group miniatures by height – tall fairy house in back, medium plants in middle, low ground cover in front.
- Leave negative space – bare soil around the path gives the eye a rest. That’s not clutter, that’s breathing room.
- Repeat colors – our pink flowers echo the pink in the gnome’s hat, and the orange marigolds tie to the red hat. Cohesion without a path? It can work. But I still think the path is superior.
One last weird personal detail: I once made a fairy garden without any path at all, and my cat sat in the middle of it, destroying the whole thing. Now I always include a sturdy rock path. Not because of the aesthetic, but because my cat can’t dig it up as easily. Practicality matters.
Conclusion
A clear path isn’t just a nice detail. It’s the difference between a fairy garden that feels like a random pile of cute stuff and one that tells a story. Whether you choose river rocks, stepping stones, bricks, or moss, just make sure your miniature characters have a way to walk to their tiny blue house. Your fairy garden will look more inviting, less cluttered, and honestly, more magical. If you try this river rock path idea, tag me in your photos. I’d love to see what you create.
#fairygarden #miniaturegarden #gardendesign #rockgarden #fairyhouse
Leave a Comment