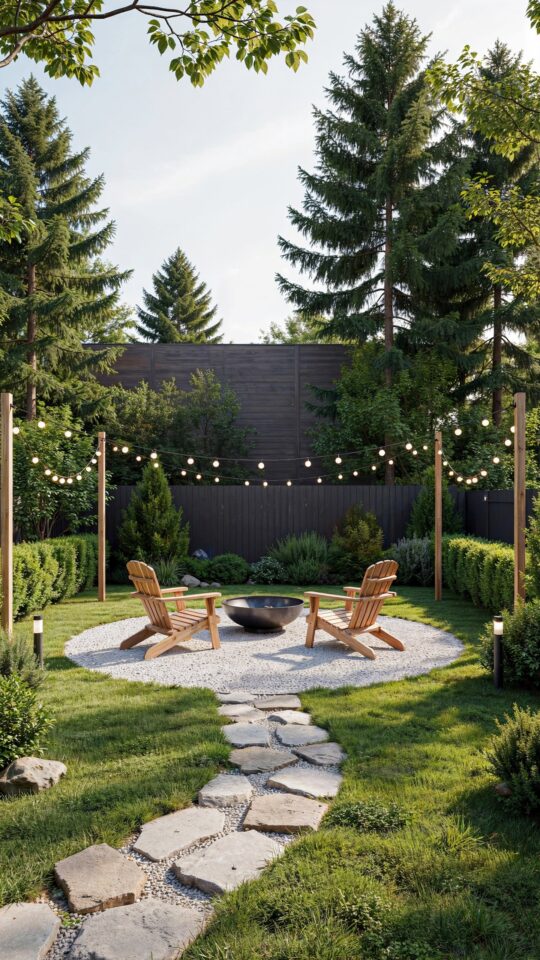
If you have been dreaming about a cozy fire pit area but the thought of permanent light posts or hiring an electrician makes you cringe, I have the perfect solution. These DIY string light poles use sturdy posts secured inside decorative planters, so you can create a warm, inviting glow without digging holes or pouring concrete. I built a set for my own backyard last spring and they have been the star of every evening gathering since. This project is surprisingly affordable, totally doable in a weekend, and it gives you the freedom to rearrange your lighting whenever you want. Let me walk you through exactly how I did it.
Why Planters Are the Best Base for String Light Poles
Using planters as bases for your string light poles solves two problems at once. First, they provide enough weight to keep your posts upright, even when the wind picks up. Second, they double as decor. You can choose pots that match your backyard style and fill them with flowers, herbs or even small shrubs. This approach is much easier than setting posts in the ground, especially if you rent your home or plan to move later. I used tall ceramic planters from a big box store, but you can use fiberglass, terracotta or even wooden barrels. Just make sure the diameter is wide enough (at least 14 inches) to hold the post steady.
Materials You Will Need for This Backyard Project
Before you start shopping, take a quick inventory of your fire pit area so you know how many poles you need. I used four poles to form a square around my seating circle, but you might want two or three depending on your space. Here is what I gathered:
- 4 square or round planters (14 to 18 inches wide, at least 12 inches deep)
- 4 pressure treated 4×4 posts, cut to 8 feet long (or your preferred height)
- Quick setting concrete mix (about one 50 lb bag per planter)
- Gravel for drainage at the bottom of each planter
- A post level and a drill with a long bit
- String lights of your choice (more on that later)
- Outdoor rated zip ties or small eye hooks for attaching the lights
- Paint or stain for the posts if you want a finished look
Total cost for my set of four poles was around $120, not including the lights. That is a fraction of what a professional installation would run.
Step by Step: Building the DIY String Light Poles
Start by drilling a small hole near the top of each post. This will be where you thread the string light cable through later, but I recommend drilling before you set the post in the planter to avoid awkward angles. Next, put a few inches of gravel in the bottom of each planter for drainage. Place the post in the center and hold it upright while you pour in the dry concrete mix. Follow the bag instructions for water amount, but I mixed it in a wheelbarrow and then poured it into the planter around the post. Use the post level to check that it is perfectly vertical, then brace it with scrap wood or clamps. Let the concrete cure for at least 24 hours before moving the planter. I let mine sit for two days just to be safe.
Once the concrete is hard, you can paint or stain the posts. I used a solid exterior stain in a warm walnut tone to match my cedar pergola. Let that dry completely, then add soil and plants around the post inside the planter. I went with low maintenance succulents and creeping jenny for a lush look that does not need constant watering. Now your pole is ready for lights.
Tips for Positioning Your Planters Around the Fire Pit
This is where the real magic happens. I placed my four poles at the corners of a 12 by 12 foot square with the fire pit in the center. That left enough room for chairs and a small side table without anyone bumping into a post. If your fire pit is smaller, bring the poles closer. A good rule of thumb is to keep the string light lines at least 7 feet off the ground so people can walk under them comfortably. When you set the planters, angle the pre drilled holes toward the fire pit so the string light runs in a straight line between poles. Use zip ties through the hole to secure the light cable, then tighten it gently. Do not pull the cable too tight because it will sag anyway, and that saggy look is actually what makes string lights feel cozy.
One more tip: if you live in a windy area, add a layer of pea gravel on top of the soil inside the planter. This adds a few extra pounds of weight and prevents the soil from blowing out. I also wrapped a small bungee cord around the top of the post and the light cable as a backup. Overkill? Maybe, but I have never had a pole tip over.
Choosing the Right String Lights for a Cozy Vibe
Not all string lights are created equal. For a fire pit area, you want warm white bulbs (around 2700K) and a dim, vintage look
#DIYStringLightPoles #FirePitArea #OutdoorLightingIdeas #BackyardDecor #PlanterProjects
Leave a Comment