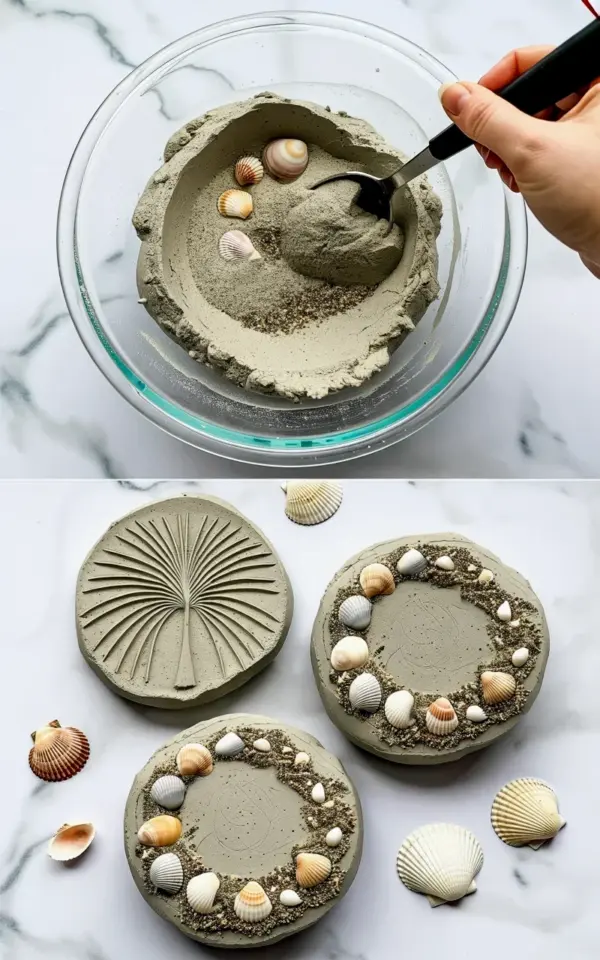
If you have ever wanted to save a perfect day at the beach without hauling home a bucket of wet sand, this DIYBeachCrafts project is your answer. I made these seashell and sand concrete coasters a few weekends ago and honestly, the process was way more satisfying than I expected. The top half of the photo shows exactly where it starts: a glass bowl full of light gray clay dough, tiny seashells, and gritty sand, with my hand stirring it all together with a spoon. The bottom half? Three finished circular casts, each one pressed with a distinct palm print and studded with shells. They sit on a white marble surface looking like little souvenirs from a summer that refuses to end.
Look, I am not a concrete artist. I am a person who forgets to water her plants and once left a batch of salt dough in the oven for three hours. But this project clicked for me. The texture turned out better than I hoped, and the shells embedded in each circle give it a raw, beach-combed feel. No two coasters look the same, which is kind of the point. So if you want a practical keepsake that doubles as actual decor, keep reading. I will walk you through every gritty step.
Why This DIY Beach Sand Handprint Keepsake Actually Works
Most handprint keepsakes end up as fridge magnets or dusty ornaments. These coasters have a job. You can set a cold drink on them, and they won’t melt or warp. That matters to me because I hate craft projects that just sit there looking pretty but do nothing. The sand and shells give the surface a slight roughness, so glasses don’t slide around too much. Plus, the palm print in the center adds a personal touch that makes it feel like a real memory, not just a generic souvenir.
The key trick is using gray clay (or concrete mix) that is thick enough to hold the imprint but still wet enough to embed shells. I used a standard cement-based crafting mix, but you can also try plaster of Paris if you want a lighter color. Just know that plaster chips easier than concrete. Not gonna lie, I chipped one of my first attempts. So go with concrete if you want durability. Also, the shells need to be small and flat. Big snail shells won’t stay put. I learned that the hard way.
What You Need for Seashell and Sand Concrete Coasters
Gather your supplies before you start mixing. Nothing kills the creative flow like realizing you are out of shells halfway through. Here is my honest list, no fluff:
- Gray concrete mix or cement-based clay (about two cups for three coasters)
- Clean beach sand (or play sand from a hardware store, but real beach sand has better texture)
- Small seashells – broken pieces work great, whole tiny ones too
- A mixing bowl (glass is fine, but don’t use your favorite one; concrete residue is a pain)
- A spoon or stir stick (disposable is smart)
- Plastic wrap or a silicone mold (I used a shallow silicone circular mold, but you can press into plastic wrap lined bowls)
- Water (tap water is fine, but let it sit for a minute to dechlorinate if you are precious about it)
- Gloves – because concrete on your skin dries and cracks. Trust me.
One weird detail: I used a spoon from a thrift store that had a bent handle. It worked perfectly for stirring because the curve helped fold the sand into the clay without flinging shells everywhere. That spoon now lives in my craft drawer. It is a hero.
Step 1: Mix the Gray Clay With Sand and Shells
Start with your dry concrete mix in the bowl. Add about a third of a cup of sand and toss in a handful of small shells. Stir them around with a spoon to distribute everything evenly before you add any water. This way the shells don’t all clump in one spot. Then slowly pour in water, a tablespoon at a time, while mixing. You want a thick dough that holds its shape when you squeeze it. If it drips off the spoon, it is too wet. Add more dry mix.
The photo in the top half shows exactly this stage: a hand stirring the gray dough with a spoon, shells and sand visible throughout the mixture. It should look lumpy, not smooth. That is good. Smooth concrete won’t hold the palm print well because it slumps. You want something that feels like a stiff cookie dough. If you accidentally add too much water, sprinkle in a little more concrete mix. I once added sea salt thinking it was sand (don’t ask, I was distracted by a seagull outside), and the whole batch got weirdly sticky. So stick to sand.
Step 2: Press the Palm Print and Add Texture
Scoop the mixture into your mold and press it down firmly to eliminate air pockets. Then take a deep breath and press your open palm into the center. Push evenly, not too deep. You want the imprint to be clear but not so deep that the edges crack. I found that pressing slightly off-center looks more natural, like a casual hand grab. After you lift your hand, sprinkle a few extra tiny shells around the edges of the print and press them in gently. This is where the bottom half of the photo comes to life – those three circles with embedded shells and distinct palm patterns. Each one has a slightly different shell placement, which makes them feel handmade.
If your handprint smudges or looks blurry, you pressed too lightly or the mix was too wet. You can gently scrape out the coaster and start over. I had to redo one because I sneezed mid-press and my hand shifted. It is fine. That coaster became a practice piece that I now use as a paperweight. No waste. Anyway, once you are happy with the print, let the mold sit uncovered for about 10 minutes so the surface begins to skin over before adding any decorative shells on top if you want more. I added a few tiny white shells around the wrist area on one coaster, just for fun.
Step 3: Let It Cure and Pop Them Out
Here is the part most tutorials gloss over: curing takes patience. Concrete hardens in a few hours, but it needs moisture to reach full strength. Cover the molds loosely with plastic wrap for the first 24 hours so they don’t dry too fast and crack. I left mine on the kitchen counter. My cat jumped up and sat on one of the wrapped molds, leaving a dent. So keep your pets away unless you want a cat-paw print coaster. Honestly, that would be cute too, but it is not what I was going for.
After 24 hours, gently pop the coasters out of the molds. They will feel solid but still slightly damp. Let them air dry for another two days in a warm spot. Do not put them in the oven to speed things up. Concrete can develop tiny hairline cracks if you force dry it. I learned that from a YouTube comment, tried it anyway, and got a cracked coaster. So listen to me on this. After the full dry period, you can lightly sand the edges with fine-grit sandpaper if they are rough. I skipped that step because I like the raw look. But if you want smooth sides, go for it.
The Before and After – What to Expect
The before is a messy bowl of gray sludge with shell chunks. The after is three solid, functional coasters that smell faintly of the beach (okay, that might be in my head, but they do have a mineral scent). The bottom photo on white marble shows exactly what you get: round casts with embedded shells and a clear palm print in the middle. The texture is slightly gritty but not rough enough to scratch a table. I tested them on a glass coffee table and no scratches. The color dries to a light gray, almost like weathered stone. If you want a darker shade, add a small amount of black pigment powder during the mix. I kept it natural because the shells pop against the gray.
One thing that surprised me: the shells that were fully embedded look glossy while the ones on the surface look matte. That contrast gives each coaster depth. They photograph well too. I have already sent a picture to my mom, who asked for a set for her birthday. So now I have to make more. Not a bad problem to have.
Tips for Avoiding Cracks and Other Mistakes
I already mentioned drying too fast. But also, if you press your hand too hard, the coaster will crack around the edges of the print. Aim for a gentle, even pressure. Another mistake: using shells that are too big. A shell that sticks out more than a quarter inch will break off once the coaster is dry. Keep your shells small and flat. And for the love of cleanup, wear gloves. Concrete dries on skin like a weird second layer that takes days to fully wash off. I looked like I had a minor skin condition for a week. Not cute.
If you want a truly smooth finish, you can wet-sand the top surface after curing. Use a sponge and a little water, gently rubbing in circles. That will expose more shell texture and give it a slightly polished feel. I did that on one coaster and left the other two raw. The smooth one looks more like a store-bought item, but the raw ones feel more authentic to me. Your call.
So there you have it. A simple, messy, rewarding way to turn a beach memory into something you can actually use. The coasters make great gifts, conversation starters, or just a way to keep that summer feeling around all year. If you try this, I would love to know how your palm prints turn out. Drop a comment below or tag me in your photos. Happy crafting.
#DIYBeachCrafts #HandprintKeepsake #SeasideDecor #ConcreteCrafts #BeachInspired
Leave a Comment