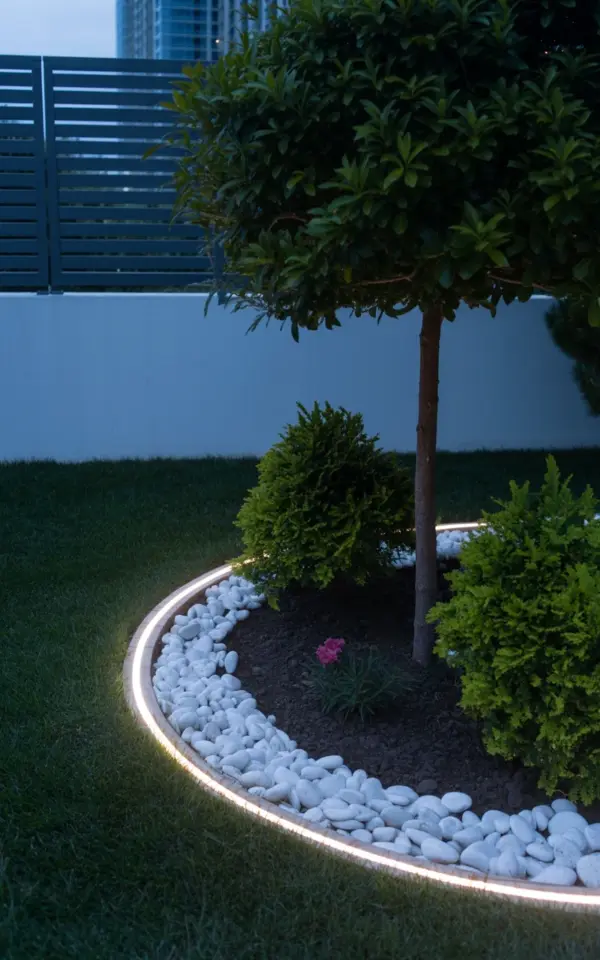
On a clear evening, when the rest of the yard fades into shadow, a curved garden bed lighting design transforms your patio into a place you actually want to sit. The photo that inspired this guide shows white river rocks glowing along a gentle curve, warm LED strip lights hugging the border, and neatly trimmed evergreens framing a central shade tree. This is not a complicated project. With a few materials and a calm afternoon, you can build the same nighttime patio ambiance for yourself. I have installed this exact layout in my own backyard, and I will walk you through every step so you can avoid my mistakes.
Choosing the Right LED Strip for Outdoor Garden Lighting
Not every LED strip works when it meets dew, sprinklers, or summer rain. You need a fully weatherproof strip with an IP68 rating. That rating means the diodes are sealed in silicone, so water cannot short the circuit. Look for a warm white temperature between 2700K and 3000K. Cool white light will make your white river rocks look sterile. Warm light brings out the subtle tan and gray flecks in the stones and makes the garden bed feel cozy.
The length of the strip depends on the curve of your bed. Measure the arc with a flexible tape or a piece of string, then add 10 percent for slack and connection ends. I recommend buying a reel that comes with a plug-and-play transformer rather than a hardwired system. Outdoor rated extension cables let you run the cord to a covered outlet without cutting into house wiring. If you prefer a low voltage system, a 12 volt LED strip paired with a landscape lighting transformer gives you more control.
How to Layout a Curved Garden Bed for Nighttime Patio Ambiance
Before you dig, mark the shape of your garden bed with a garden hose or a rope. Curves look better when they mimic natural lines rather than perfect circles. I laid my hose in a gentle S curve along the edge of my patio, leaving enough space for the evergreens to grow without crowding the walkway. Step back and look at the shape from different angles. Adjust the hose until the flow feels right. This is the moment to decide where your central tree will go and where the trimmed evergreens will sit.
Once you are happy with the outline, spray paint the ground along the hose. Then remove the hose and dig a shallow trench about four inches deep and six inches wide along the painted line. This trench will hold your LED strip and the river rocks. Keep the soil from the trench in a wheelbarrow. You will use it later to fill the bed around the plants. A flat shovel and a hand trowel are all you need. Do not overthink the depth. The LED strip should sit just below the surface so the rocks can cover it without hiding the light completely.
Preparing the Soil and Installing Your LED Strip Under River Rocks
After the trench is dug, line the bottom with a thin layer of landscape fabric. This prevents weeds from pushing through the rocks and keeps the soil from washing onto the LED strip during heavy rain. Press the fabric flat and cut it to fit. Then lay your LED strip along the curve of the trench. Use plastic landscape staples to pin the strip in place every foot. Do not stretch the strip tightly or it may kink and create dark spots. Let it follow the natural bend.
Now comes the part I find most satisfying: covering the strip with white river rocks. You want rocks that are about one to two inches in diameter. Anything smaller and the light bleeds through unevenly. Anything larger and the rocks wobble and shift. Pour the rocks directly over the LED strip until they are level with the surrounding lawn or patio. Do not pack them down. The tiny gaps between the stones are what let the warm light filter through. Test your lights before you fill the entire trench. Plug the strip in and check for any sections that are too dim or completely dark. Adjust the rock placement until the glow is even along the whole curve.
- IP68 rated LED strip (warm white, 2700K-3000K)
- Transformer (12 volt or plug-in, rated for outdoor use)
- Landscape fabric (to keep soil and weeds away)
- White river rocks (1 to 2 inch diameter, washed)
- Plastic landscape staples (to secure the strip)
- Garden hose or rope (for marking curves)
- Spray paint (for the outline)
- Flat shovel and hand trowel
Adding Trimmed Evergreens and a Central Shade Tree for Depth
With the lighting base in place, it is time to plant. The two neatly trimmed evergreen shrubs in the photo are probably dwarf boxwood or globe arborvitae. Both hold their shape well and respond to light pruning. Plant them on either side of the central tree, about two feet from the lit border. Dig holes twice as wide as the root ball but no deeper. Backfill with the soil
#gardendesign #patiodecor #outdoorlighting #landscapelighting #ledgardenlights
Leave a Comment