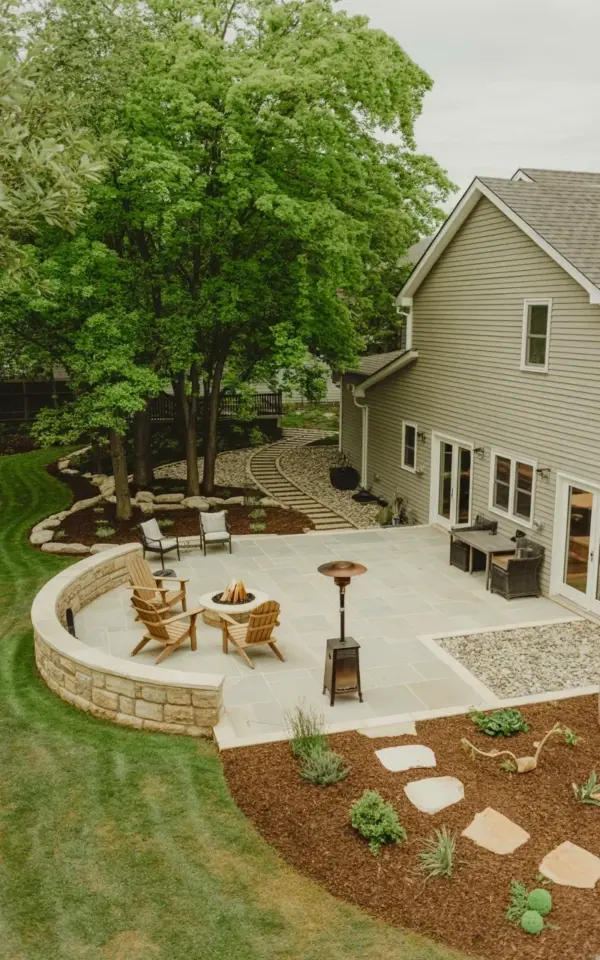
I learned the hard way that a curved fire pit patio is not a forgiving project. You get one shot at the layout before the concrete sets and you are stuck roasting your shins or freezing your back. Here’s the thing: I see the same mistake over and over in photos people post online. They nail the stone, they pick gorgeous Adirondack chairs, and then they goof the distance. This is that mistake. I made it myself on my first try. Let me save you the trouble.
The Real Problem with Seating Distance Around a Curved Fire Pit
Ok so, the number one error is not measuring the gap between the fire ring and the chair legs. It looks simple. You plop down a circle of pavers, you put four chairs around it, done. But no. The curve messes with your perception. A straight line is easy to gauge. A curve fools your eye into thinking you are closer than you really are. I have sat in a curved setup where my knees were almost touching the fire. Not cozy. That was a sweaty, uncomfortable mess.
Here’s my specific number. We left about 4 feet between the front edge of the Adirondack chairs and the edge of the fire ring. And honestly, that feels perfect. Not too toasty, not too distant. You can lean forward to warm your hands, lean back and still feel the glow. The people who put chairs 2 feet away? They roast. The ones who put them 6 feet away? They lose the whole vibe. The fire pit becomes a decoration, not a gathering point. So measure that gap carefully. Use a tape, not your gut.
How We Got the Stone Paver Pattern to Flow With the Curve
The second biggest hurdle: the patio design tips around curves. Straight joints look horrible on a bend. I know, because I tried to save money by using standard rectangular pavers. Ended up with a jagged mess that looked like a kid’s puzzle. So we switched to a mix of flagstone and natural edge cuts. The flagstone gives that organic irregular shape. The natural edge cuts let us trace the curve without forcing square blocks into a round hole.
We laid the stones in a running bond pattern, but adjusted each stone slightly to follow the radius of the fire pit. It took more time. A lot more time. But the result is a smooth, river-like flow. The eye follows the curve naturally. And the stones themselves are that light beige color you see in the photo. That color matters. It reflects heat instead of absorbing it, so the stones stay cooler on a sunny afternoon. That’s a small detail that makes a big difference. Also, we used a polymeric sand between the joints. It hardens like concrete and keeps weeds from popping through. Two years later, not a single weed. I’m not kidding.
Why We Put a Black Patio Heater in the Middle (And You Should Too)
Look, I love a fire pit. But not every night is a crisp, calm 60 degrees. Sometimes it’s too cold, or the wind shifts and smoke blows in your face. That black outdoor heater you see standing in the center of the patio? That’s our backup plan. It’s not a replacement for the fire, it’s a supplement. On a borderline night, we light both. The fire gives the ambiance, the heater gives the warmth. It’s a 50,000 BTU unit, tall, sleek, and it doesn’t yell for attention. It just works.
One thing I did not expect: the heater actually helps with the smoke issue. When the air is still, smoke rises straight up. But when there’s a breeze, the heater’s infrared output creates a small thermal column that messes with the airflow. Not gonna lie, it’s not a perfect fix, but it pushes some of the smoke away from the seating area. That alone was worth the price. And it tucks away nicely next to the retaining wall when not in use. If you live anywhere that gets chilly spring evenings, buy one. You will thank me.
Retaining Walls and Mulch Beds: The Unsung Structure
The stone patio ideas only work if the ground beneath them stays put. Our patio is on a slight slope, so we built light tan stone retaining walls around the perimeter. They are not massive. Just two feet high at the tallest point. But they define the space beautifully. The walls also give us a natural border for the mulch beds. In the photo you can see that fresh dark brown mulch with young plants and decorative rocks. That’s not just for looks. The mulch bed acts as a buffer zone between the patio and the lawn. Grass clippings stay off the stones, and water runoff seeps into the mulch instead of washing across the patio.
One weird thing I did: I buried a small French drain behind the retaining wall. Just a perforated pipe wrapped in fabric. It catches water that would otherwise pool behind the wall and push it out into the yard. That has saved the wall from cracking during heavy rains. Most people forget drainage when they build a curved patio. They focus on the pretty stone and forget the water. Do not be most people.
The Curved Stone Pathway That Connects Everything
You see that curved stone pathway leading from the patio in the image? That was actually the first thing we built. It starts at the back door of our beige vinyl-sided house (white trim, lots of windows) and winds gently down to the patio. I made the path about 3 feet wide. Wide enough for two people to walk side by side, narrow enough to feel intentional. The stones are the same flagstone as the patio, just smaller pieces. That visual continuity makes the whole yard feel like one designed outdoor living space rather than a bunch of random elements.
I laid the path in a loose S-curve. No strict geometry. I just set the stones, stepped back, adjusted, then stepped back again. It took three tries before the curve looked natural. Pro tip: lay the stones dry first, then walk them. If your stride feels awkward or you have to step too wide, move the stones. The flow of foot traffic matters more than a perfect sweetgrass curve.
Three Quick Backyard Landscaping Lessons I Learned the Hard Way
- Don’t skimp on base material. I used 4 inches of crushed gravel under the patio. My neighbor used 2 inches. After one winter, his pavers sank and mine didn’t. The cost difference was about $200. Worth every penny.
- Adirondack chairs are not all created equal. The wooden ones in the photo are cedar. They weather to a soft gray if you don’t seal them. I sealed mine with a clear coat, but now I wish I had let them gray. The sealed wood gets sticky in high humidity. Pick one or the other, but commit.
- Plants close to the fire pit will struggle. The heat dries out the soil faster. I lost two small boxwoods in the first summer. Now I only put decorative rocks and heat-tolerant succulents near the fire ring. The young plants you see in the photo are all at least 4 feet away. That distance matters for the greenery too.
What I Would Do Differently If I Had to Start Over
Honestly? I would have hired a professional to lay the first course of stone around the fire pit. That ring sets the entire geometry. I did it myself, and the first few stones are slightly off. Not enough to notice unless you stare, but I know. The curve is not perfectly concentric. It bugs me every time I sit there. That’s my weird little obsession. If you are a perfectionist like me, pay for the first hour of pro labor. It’s worth the peace of mind.
Also, I would have added a low-voltage lighting strip under the lip of the retaining wall. We have string lights overhead, but ground lighting would make the curve pop at night. I might still add it next spring. That’s on my list. Anyway, the patio works great. We use it every weekend from April through October. And the one time someone sat too close and complained about the heat? I just smiled and said, “That’s exactly why we have 4 feet of space.”
So what’s your biggest patio planning struggle? I’m genuinely curious. Drop a comment or message me. I have tried a lot of dumb ideas so you don’t have to. And if you are building a curved fire pit patio, measure that distance twice. Trust me on this one.
#curved fire pit patio #outdoor living space #patio design tips #stone patio ideas #backyard landscaping
Leave a Comment