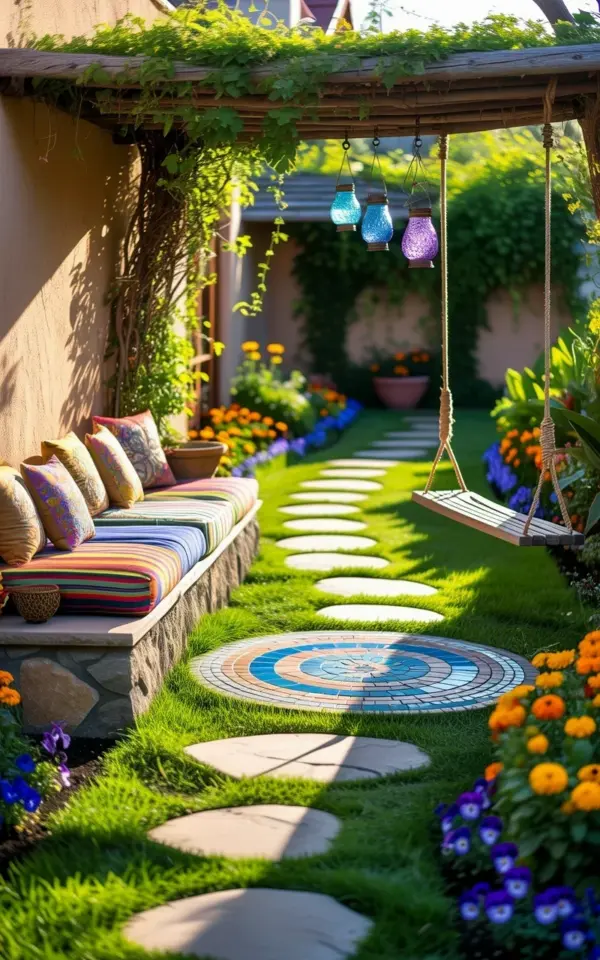
There’s a specific weight to the first step on a handmade garden path. It feels solid, but not like concrete. It feels like the ground decided to meet you halfway. That’s what a bohemian garden pathway should do, and honestly it took us two failed attempts to get there. In the finished photo you can see what we landed on: curved stone steps, a circular mosaic medallion in blue and earth tones, a stone bench piled with colorful striped cushions, blue and purple glass lanterns hanging from a wooden overhead beam, and a wooden swing on the right side of the frame. It didn’t start that way. We made a series of avoidable mistakes, and this guide is basically the letter we wish we’d read before picking up a shovel.
Mistake #1: Choosing a Path That Fights the Lawn
Our biggest mistake was thinking a garden path needed to be a straight, rigid line. That’s how you end up with something that looks more like a sidewalk than a bohemian garden pathway. The photo shows what worked: large flat stones arranged in a gentle curve across a manicured lawn. The curve matters. It slows your pace and encourages you to look around instead of marching toward a destination.
Common issue number two is material. Tiny pebbles or thin pavers sink into soft soil and look awkward after one season. Use big, flat stones. They need to be thick enough to sit proud of the grass without tipping when you step on the edge. We used sandstone, about two inches thick, and it has held up through rain and foot traffic.
The Art of the Curve (and Why Straight Lines Kill a Boho Vibe)
Before you buy anything, lay out your curve with a garden hose. That sounds simple, but we skipped it and paid for it in regret. Spend an afternoon moving the hose back and forth, walking the line, and imagining where your foot naturally lands. My neighbor thought I was watering the grass. I let him think that.
When you mark the stones, keep spacing in mind. A comfortable stride means about six to eight inches between stones. Too far and visitors have to stretch. Too close and it feels like a hopscotch board. For a curved pathway, let the stones fan out slightly on the outside of the curve, almost like a staircase. That’s what gives the path that relaxed, boho feel.
The Mosaic Medallion: A Focal Point That Anchors the Whole Path
We chose a circular mosaic stepping stone in blue and earth tones, and it sits right in the center of the pathway. That was not an accident. A medallion gives the eye a place to rest and breaks up the monotony of step after step. The common mistake here is placing it somewhere irrelevant, like at the very edge of the path. Put it where it actually interrupts your stride.
Here’s what to keep in mind when adding a medallion:
- Keep it level and set it flush with the soil so it doesn’t become a tripping hazard.
- Pick colors that echo the rest of the garden, in our case the blues and purples of the hanging lanterns and the earthy red tones in the bench cushions.
- Don’t surround it with busy patterns. One medallion is enough.
- Make sure the stones around it meet the medallion without big gaps. Grout or gravel fills those gaps, but too much looks sloppy.
We bought ours from a local tile artist, but you can also make one by pressing small tiles or broken pottery into a concrete base. It’s more forgiving than it sounds.
The Bench and Cushions: Why Cozy Beats Pristine
Another mistake we see everywhere is benches that look like they belong in a showroom. A stone bench can feel cold and uninviting if you leave it bare. In the photo, our bench is piled with colorful striped cushions and decorative pillows. That’s not just for looks. It’s an invitation to sit down and stay a while, which is the whole point of a boho backyard.
Use outdoor fabric, not everyday indoor pillows. The first set we bought looked beautiful for exactly two weeks before rain ruined them. Now we use performance fabric with removable covers, and the pile itself is part of the charm. Mix patterns, but keep a common color thread. Stripes work well with solids and smaller prints. Don’t be afraid to layer four or five cushions on a bench, it should look slightly overdone. That’s the style.
Overhead Wood and Lanterns: Don’t Forget the Vertical Layer
We almost finished this whole project without considering what happens above eye level. That was a mistake. A garden path at ground level is nice, but it can feel flat and unfinished. The addition of a wooden beam overhead changed everything. It frames the path and gives us a place to hang things. In the photo, decorative glass lanterns in blue and purple hang from that beam, casting color as the light shifts through them.
If you’re planning your own boho backyard, think about the vertical layer early. It’s much harder to install a beam after the stones are already laid. Make sure the beam is properly secured, especially if you’re in a windy area. We used heavy-duty brackets and checked the weight rating twice because a falling beam is not a vibe. Use weatherproof lanterns with LED candles inside. Real flames work, but they attract bugs and require constant attention.
The Wooden Swing: A Mistake We Almost Made (and How to Avoid It)
Our wooden swing sits on the right side of the frame, and it’s the first thing guests ask about. It almost didn’t happen because we nearly hung it from a branch that wasn’t strong enough. The tree looked sturdy from the ground, but the branch was actually deadwood. That would have ended badly. We built a separate freestanding wooden frame instead. It’s more work, but it’s safe and it doesn’t depend on a tree that might fail.
When you add a swing to a garden path area, think about the flow. Place it to the side of the path so it doesn’t block the line of movement. Leave enough clearance in front and behind. Use chains instead of rope because rope stretches and frays. And for goodness’ sake, count the weight. A wooden swing with three adults on it is not the same as one person relaxing alone. We hang ours from a cedar beam with rated hardware, and it has never wobbled.
Before and After: What We Would Do Differently
The real lesson from this transformation is that a bohemian garden pathway is a process, not a single weekend project. We stripped out the old straight stepping stones, re-laid the curve, added the medallion, and only then started decorating. If we could go back, we would start with the path layout and the overhead structure before ever buying a single cushion or lantern. The soft furnishings are the fun part, but they can’t save a path that’s poorly planned.
Look at the photo again. The stones, the medallion, the bench, the lanterns, and the swing all work together because they were chosen with the same palette and the same relaxed intention. There’s no single element they got right. They simply avoided the common mistakes we made, and that’s the whole secret. Save this idea for your own garden makeover, and when you’re ready to dig, take your time with the path first. Everything else will follow.
Leave a Comment