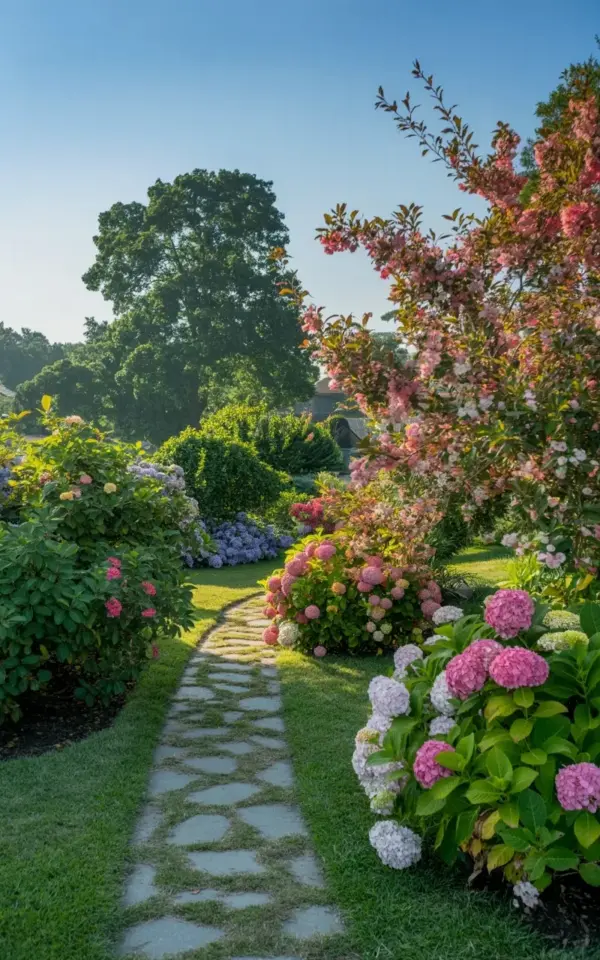
For the longest time, I looked at this sad strip of grass that connected my patio to the back gate and just felt defeated. Honestly, it depressed me. A muddy mess. A mosquito haven. I dreamed of a winding garden path, a proper stone walkway with flowers brushing my knees. The before & after photos online looked so dreamy, but the price tags? Terrifying. So I decided to do it myself. On a budget. Here is exactly how I turned a muddy disaster into a lush hydrangea garden path without going broke.
The Muddy Mess Was Real (and My Dog Was Tired of It)
Ok so the “before” picture is just… brown. Sad, compacted brown dirt with a few blades of stubborn grass clinging to life. It wasn’t a walkway. It was a drainage ditch that happened to be in my way.
My dog Gus would run down that strip and splash mud up onto the siding. Every. Single. Time. Something needed to change. I knew if I wanted a proper stone walkway, I had to start by admitting the grass was never going to win there anyway. That made the whole “rip it all out” decision way easier to swallow.
How We Got the Curve Right Without Fancy Tools
I wanted that gentle S-curve. The kind you see in English cottage gardens. Not a ruler-straight slab of concrete. A path that pulls you in, right? A curved garden path feels more organic, like it has existed for decades.
Here is the most budget-friendly design tool I used: a garden hose. I laid it out on the dirt. Stepped back. Tweaked it. Used cheap orange spray paint to mark the edges. Not gonna lie, my partner thought I was crazy walking back and forth to the upstairs window to check the view. But that hose let me visualize the curve without digging a single hole. Best $4 I ever spent on landscaping.
Sourcing the Pavers for Way Less Than Retail
Look, flagstone prices at the big orange home improvement store gave me a heart palpitation. I almost gave up right there. But I dug deeper (pun intended).
- Called local quarries: I asked for their “irregular” pile or “scrap” stone. You get the same natural beauty for half the price.
- Facebook Marketplace: Found a guy tearing out a 20-year-old patio. I hauled away his “trash” (beautiful, weathered gray and beige stones) for basically free. The stones already had that aged look. A massive win.
- Considered urbanite: That’s the fancy name for broken concrete. If you can find clean pieces, it works exactly like flagstone. My neighbor thought I was nuts. I didn’t care.
Hydrangeas on a Beer Budget
Now for the star of the show. The hydrangeas. I planted a mix of pink and white hydrangeas on both sides of the path. That dreamy, bobbing cloud of blooms? That was the goal. But buying mature hydrangeas at full price would have blown my entire budget on just three plants.
Honestly, I stalked the clearance rack at my local nursery in late spring. Snapped up some sad-looking sticks for $8 each. They looked pathetic. Bare roots. A few leaves. They are now massive bushes. It just takes a little water, some patience, and decent soil. I also took cuttings from a friend’s established hydrangea garden. Rooting them in a jar on my windowsill gave me about 10 free plants. It took an extra year for them to catch up, but my wallet thanked me.
The Flowering Tree Canopy Was a Lucky Find
That large pink flowering tree on the right side of the path? It makes the whole space feel like a secret garden. The dappled sunlight filtering through the blossoms is what gives that photo its dreamy vibe. I knew I needed a canopy.
I found a discounted “Pink Princess” tree at a local nursery. It was a little lopsided. One side was sparse. I didn’t care. I planted it anyway, and within two seasons it filled out perfectly. Buying “scratch and dent” trees is a pro move for budget landscaping ideas. Nobody cares if the
#gardenpath #stonewalkway #beforeandafter #hydrangeagarden #landscapingideas
Leave a Comment