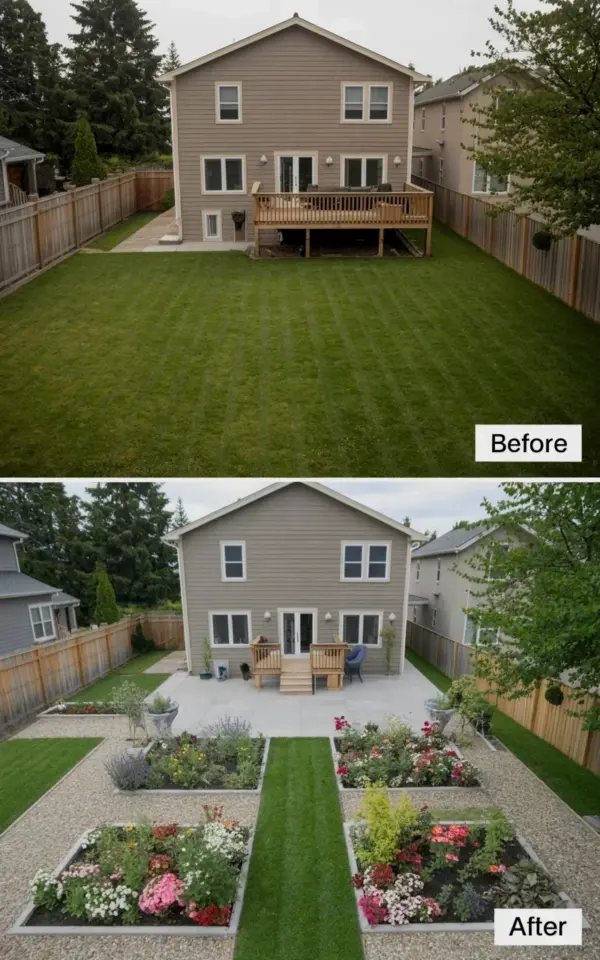
Honestly, looking back at the before photo of our backyard garden makeover makes me laugh a little. That plain green rectangle of lawn, the wooden deck with its chunky railing, the tan house just sitting there. It was fine, you know? But it wasn’t ours. The after? That’s when the property actually felt like home, with raised beds full of flowers and gravel paths that just make you want to walk slowly and enjoy the symmetry. So if you’re planning your own garden makeover, here’s exactly what we did and what I learned the hard way.
Why We Decided to Ditch the Plain Lawn
The lawn was boring. Not gonna lie, it was well-maintained (my husband mowed it religiously every Saturday), but it had zero personality. We’d sit on the deck, stare at the green emptiness, and talk about maybe planting a bush or two. But then a particularly wet spring turned the grass into a muddy mess every time the kids ran through. And the fence? That wooden privacy fence was fine but just another flat surface. Something had to change.
I started sketching ideas on napkins. Look, I’m not a professional landscaper. But I knew I wanted structure. Something that felt intentional, not just thrown together. Formal garden design kept popping up in my Pinterest feed. Symmetrical lines, clearly defined spaces. That became the goal. No more vague yard. A real room outside.
Planning the Formal Layout with Gravel Paths
This part took the longest, honestly. We measured the yard a dozen times. The key constraint was the house itself: that two-story tan house with the deck centered on the back. So we built the entire garden around that central axis. A straight gravel path right down the middle, flanked by raised beds on each side. Symmetrical. Predictable. But in a good way.
I mapped out the gravel pathways first. They needed to be wide enough for a wheelbarrow (trust me, you do not want to squeeze through with a load of soil) and slightly sloped to drain. We used a stiff landscape fabric underneath to keep the weeds down. Here’s what we considered:
- Path width: We went with 3 feet. Feels spacious, not cramped. A single person can walk with a rake, and two people can pass without stepping off into the beds.
- Edging material: We used black steel edging. It’s subtle, holds the gravel in place, and doesn’t rot like wood. Not the cheapest option, but worth every penny.
- Gravel type: Pea gravel looks pretty but it shifts underfoot. We used a crushed granite mix that compacts nicely. Still drainage-friendly but much more stable when walking.
I will never forget the afternoon we laid out the string lines. My neighbor came over and said, “Are you building a crop circle?” Very funny, Linda. But when the paths were done, even she admitted it looked like a real garden.
Building the Raised Flower Beds (What Actually Worked for Us)
We built four raised beds total: two on each side of the central path. Each one is about 4 feet wide and 8 feet long. That size made it easy to reach the middle from either side without stepping into the soil. The material? Cedar. Specifically, rough-cut cedar boards. They’re not treated with chemicals, they look natural against the fence, and they last for years even in rain. They also cost more than pine, but pine rots in two seasons. I speak from painful experience.
One weird thing: we filled the bottoms with cardboard first. Not just a thin layer, I’m talking flattened cardboard boxes from Amazon, soaked with water. It smothers any grass or weeds and eventually breaks down. Soil went on top. Saved us from having to dig up the entire lawn. My back thanked me. Or maybe it didn’t, because I still had to haul 20 bags of topsoil. But anyway.
The raised beds gave us instant structure. We planted a mix of perennials (lavender, salvia, black-eyed Susans) and annuals for instant color (petunias, zinnias). The shrubs went in the corners of each bed to give height. The whole thing felt like a formal garden within weeks.
Choosing Plants for Color and Structure
People ask me what we planted. The answer is: intentionally. I didn’t want something that looked chaotic. So I stuck to a color palette. Purples, blues, whites, with pops of yellow. Lavender along the edges (it smells amazing when you brush past it). Salvia for vertical spikes. White hydrangeas in the back corners of the beds. And one bold red rose bush that breaks the rules but makes me happy.
In the before photo, you see nothing but grass. In the after, there’s layers. Tall stuff in the back near the fence, medium height in the middle, low ground cover spilling over the raised bed edges. That’s the trick. It mimics how plants grow in nature, but arranged in tidy rectangles. Formal chaos, I call it. The gravel pathways reflect light and keep the space from feeling too crowded. It works.
Also, I killed three boxwoods before admitting they don’t like my soil. So ignore any advice that says you must have boxwood hedges. Grow what actually thrives. Salvias and lavender? They tough it out. Boxwoods? Drama queens.
The Gravel Pathway Installation Step by Step
I’ll be honest: installing gravel paths is a workout. Here’s what we did. First, we marked the paths with spray paint. Then we excavated about 4 inches of soil. That’s a lot of dirt to move. We rented a mini skid steer for the big removal because my husband has a bad back and I have a bad attitude about shoveling. Then we laid landscape fabric, secured it with stakes, and added a 2-inch base layer of crushed stone. That base gets tamped down hard. We used a hand tamper because the plate compactor was too loud for a Sunday morning. Our neighbor called the police once. True story.
Final layer: 2 inches of pea gravel. Wait, I said I used crushed granite earlier. I did. But for the top dressing on the paths, a finer gravel that compacts is better. Pea gravel is for decorative spots, not main walkways. Learn from my mistake on the first path we did (yes we had to redo one). Anyway, the final step was watering it all down to settle the stones. Then we stood back and drank iced tea. The symmetrical layout with the raised beds on both sides looked like a magazine photo. The house in the background, that same tan two-story house, suddenly looked sharp and intentional.
Before and After: What Changed the Most
The biggest change isn’t even the plants. It’s how we use the space. Before, the deck sat there unused except for holidays. Now we have a place to walk, to sit on the edge of a raised bed and pull weeds, to let the kids run along the gravel paths without turning the lawn into a mud pit. The formal design forces you to slow down. You follow the path. You stop at a bed. You notice a butterfly. It’s meditative, honestly.
Visually, the transformation is stark. The before image: beige house, green rectangle, plain fence. The after: layers of purple and green, defined edges, gravel glowing in afternoon sun. My mom cried when she saw it. I think she was proud. Or maybe allergic. Probably proud.
Tips for Your Own Garden Makeover
If you’re looking at your own backyard and dreaming of raised beds and gravel paths, here’s what I’d tell my past self:
- Don’t skip the base. Good drainage is everything. If you just pour gravel on dirt, you get mud within a month. Excavate, fabric, compact. Boring but essential.
- Symmetry is forgiving. I worried a formal layout would look too stiff. It doesn’t. The plants soften the lines. Start with a symmetrical grid and let nature mess it up a little.
- Spend money on the paths. People walk on them every day. Cheap gravel shifts. Good gravel holds. The raised beds are important but the paths are what you feel under your feet.
- Plant in odd numbers. 3 lavender bushes look better than 2 or 4. I don’t know why, it’s just true.
One more thing: take before photos from the exact same angle. Our photo comparison is so satisfying because the house doesn’t move. The fence is the same. But everything else changed. Makes you feel like you actually accomplished something.
Anyway, that’s the story of our backyard garden makeover. The lawn is gone. The raised beds are full. The gravel paths lead somewhere worthwhile. If you’re thinking about doing something similar, just start with a plan, a shovel, and a willingness to mess up a few times. That’s how any real transformation happens.
If you have questions about your own project, drop them in the comments! I’d love to hear what you’re planning. Or if you’re just here for the before-and-after eye candy, I totally get it. Pin away.
#backyardgarden #beforeandafter #gardenmakeover #raisedbeds #landscapeideas
Leave a Comment