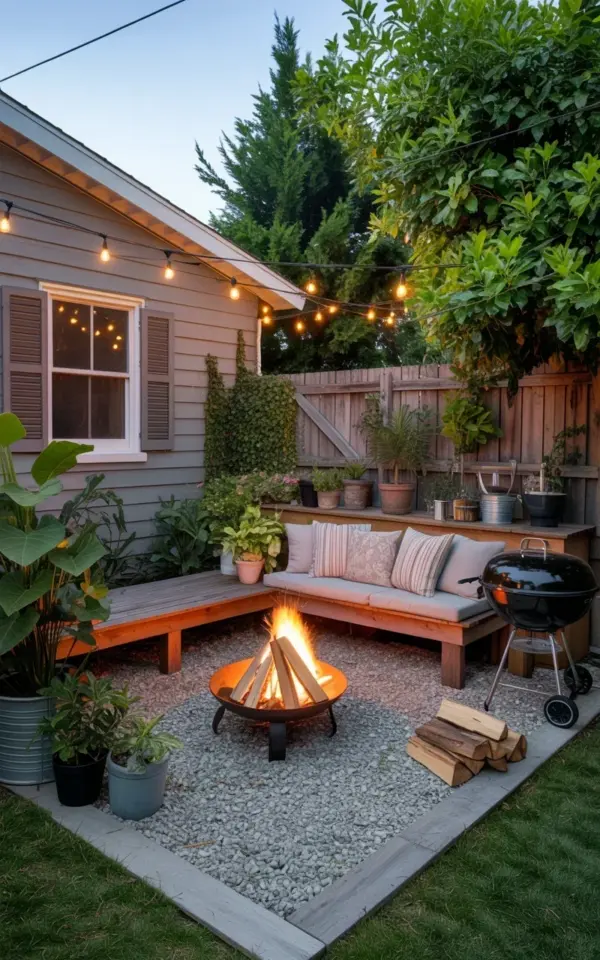
A few weekends ago, my neighbor texted me a photo of her newly finished backyard. It had the same old patchy lawn, the same boring fence, but smack in the middle was this incredible circular fire pit surrounded by soft, light gray gravel. The whole area looked so inviting and, honestly, I was jealous. She told me the whole project cost less than a fancy dinner out twice a month. That conversation is exactly why I’m writing this post about backyard patio ideas on a budget, because most of us think we need thousands of dollars to create an outdoor space we actually want to use.
That photo she sent, it’s the perfect blueprint for a cozy gravel patio. The secret isn’t a huge concrete slab or a custom pergola. Instead, it leans on texture and warmth. There’s a curved wooden bench hugging the fire pit, layered with plush gray cushions and a couple of striped throw pillows. The house’s wooden deck steps down onto the gravel, where potted plants, from a large broad-leafed tropical plant on the left to smaller terracotta pots along the edges, soften the hardscape. It looks expensive, but every single element is a budget-friendly swap.
Starting with the Base: Cheap Gravel Patio Ideas
Let’s talk about the foundation, because that’s where most people panic. A poured concrete patio runs you anywhere from $6 to $12 per square foot when you hire someone, and it’s permanent. Gravel, on the other hand, is forgiving, cheap, and you can install it yourself over a single weekend.
Here’s the thing, you don’t need to rush out and rent a massive compactor machine. A simple hand tamper works fine for a smaller area. Lay down landscape fabric to keep the weeds from invading, then spread a base layer of crushed stone followed by a top layer of pea gravel or the lighter “beach pebble” style rock. The light gray gravel in the reference photo is gorgeous because it reflects the sunlight during the day and doesn’t look like a black hole at night. It keeps the space feeling open and airy.
Making the Fire Pit the Focal Point (Without the Cost)
You might think a built-in fire pit is a splurge, and you’re right. But you know what isn’t a splurge? A steel fire ring. These metal inserts come in all sizes, and you can set one directly on a flat layer of paver stones over your gravel. They’re usually under $100 for a decent size.
Then, you build around it. Or, the easier route, you just nestle it into a circle of gravel and call it a day. Look, the circular fire pit in the photo works so well because it’s the center of gravity. Everything radiates outward from it. If you put a ring of edging stones around the fire pit, you create a distinct border that stops the gravel from creeping inward. It’s a simple trick, but it makes the setup look designed rather than just thrown together.
DIY Seating: The Curved Wood Bench Solution
Store-bought patio furniture is either flimsy or insanely expensive. There’s no in-between. Instead, channel the look from the photo and build a curved bench using retaining wall blocks and wood.
Here’s a practical approach: Use cap blocks to form a gentle curve around the back half of the fire pit, then lay 2x4s or cedar planks across the top. The blocks are heavy enough to hold the wood in place without needing concrete mortar. I built one for my own sister last summer for about $140 in materials. We used a simple miter saw and it took us an afternoon. And the best part? It doesn’t need to be perfectly symmetrical. A gentle arc is much more interesting than a straight line.
Once the frame is up, you just define the seating with cushions. Grab some outdoor foam, cut it to size, and wrap it in weatherproof fabric. Or, honestly, just buy a few cheap chaise lounge cushions off Amazon and rest them on the wood. The light gray cushions in the image add that cozy, expensive feel, and the striped throw pillows give it that “lived-in” Pinterest vibe.
Greenery and Planting on a Dime
The plant game is where this budget patio really comes alive. But here’s my mild complaint: nurseries charge an arm and a leg for big plants. The solution is to buy small or split what you have.
Take a look at the photo again. That large leafy plant on the left side anchors the whole corner. You don’t need to buy that huge plant; you just need something with height. A tall pot with some ornamental grass or a trellis with climbing vines gets you the same visual balance. You can also use smaller potted plants along the edges to create a natural border between the gravel and the wood retaining wall.
– Buy a few gallon-sized plants instead of mature 5-gallon ones.
– Repurpose old buckets and paint them a matte black for cheap planters.
– Propagate cuttings from friends’ houses. You can start a whole garden for free.
– Mix in some tall, cheap grasses for that established, “thick” look.
Lighting the Space Right
This is one of those backyard patio ideas on a budget that gets overlooked too often. A porch light from the house isn’t enough. It creates harsh shadows and ruins the mood.
Use a string of bistro lights draped from the house down to a few bamboo poles staked in the ground. This creates that enclosure effect so you feel like you’re in a secret garden. You can get 50 feet of outdoor string lights for less than $25. Add some solar pathway lights along the retaining walls or tucked in the shrubs if you want, but don’t go overboard. The fire will do most of the heavy lifting once it’s dark. The flicker against the light gray gravel and the wooden bench is exactly what they have in the reference picture; it’s cinematic, and it costs you nothing but the wood for the fire.
Real Talk: The Budget Breakdown
Let’s get specific about money because that’s the whole point of this article. I priced out the entire setup for my neighbor’s yard (the one in the original text) using local supply store numbers. It came to around $600 total, and she did it over three weekends.
That price included the gravel, the landscape fabric, the basic steel fire pit, the concrete blocks for the seating wall, and the lumber. The cushions and pillows pushed the total up, but you can score those at a big-box store during their end-of-summer clearance. It is so much cheaper than a $3,000 paver installation, and you get the flexibility of changing the layout whenever you want. If you don’t like the fire pit’s position, just rake the gravel and move it.
Staging the Space for Daily Use
The final thing to think about is how you live in this space. The photo shows a wooden deck descending from the house, which is great, but what if you’re stepping directly onto grass? Lay a few stepping stones from the back door to the gravel patio, so you don’t have to walk through mud when it rains.
Also, keep a little stack of wood somewhere near the fire pit, but not directly on the gravel. The bark and dirt will fall off and mess up that clean “light gray” look you worked so hard to create. A simple repurposed metal bucket or a wooden crate works perfectly. Add a small side table for drinks, maybe a cinder block with a pretty board on top, and you’re done. That’s the kind of practicality that turns a pretty picture into a space you’ll actually use every evening until the snow flies.
Anyway, I hope this proves that a beautiful outdoor space isn’t just for people with big contractors’ budgets. You can do this. Pick one element, maybe the gravel or the bench, and start small this weekend.
If you tackle a similar project, I’d love to know how it turns out. Drop a comment below and tell me what corner of your yard you’re planning to fix up first.
Leave a Comment